Add a footer
Anyone can do this at a basic level. Making it look great, or even good, could require some expertise.
If you'd like something to display at the every bottom of every page on your blog then you could add a Custom Footer. Many themes already have a Footer — it may include a Search box, a link to your blog or to RSS feeds, a Copyright statement, information about the theme, or something else.
Here are the footers from two of my sites which use different themes from one another.

Footer on my personal blog.

Footer on my Love Waikawa Beach blog.
While I was developing this site I added a Custom Footer about it being a test blog. The items about subscribing via RSS and Following the blog come from the theme I chose.
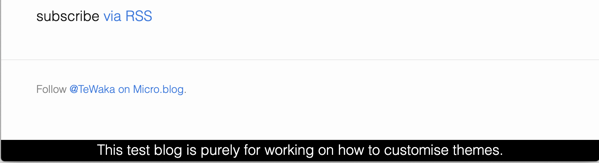
TeWaka custom footer.
The custom footer in the screenshot above includes HTML coding so it displays in white on black and centred.
I had to do some extra coding to centre the text and put it in white on a black background.
If you add a custom footer it may not turn out as you expect. Elsewhere on this site I aim to add instructions about using CSS and HTML for customising your blog. Don't know what CSS and HTML are? That'll be explained later.
Add a plain Custom Footer.
- Go to the Design section for your blog.
- In the Custom theme: section click on the Edit Footer button. A new page opens up with a box for entering coding for a Footer.
- Enter what you want in the Footer.
- Save your changes with the Update Footer button.
- Visit your blog and Refresh to see the changes.
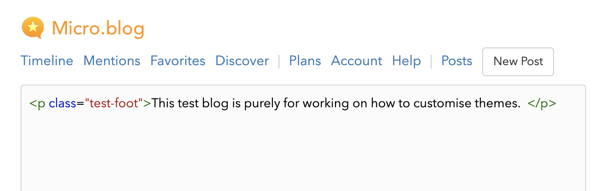
My custom Footer code for this blog while I was developing it.
You may find that without special coding your Custom Footer displays in a weird or unacceptable way. In that case go back and remove it, then read more of this blog to find out about HTML and CSS.