How to style an image in a post
You can do this.
Suppose you pull out your iPhone, take some photos and decide to send one picture there and then to Micro.Blog. You write a few words to go with the picture in the Micro.Blog iPhone app, attach the photo, include alt text (known as a description) and send.
There's no HTML in the process and probably no Markdown. It's very easy: write a few words, add the photo and alt text and post. It's simple (and one of the things I like about Micro.Blog).
My screenshot shows an example of a photo I posted from my iPhone, along with the coding it ended up with behind the scenes. Later on I edited the blog post to include the HTML comment: <!-- posted via iPhone app -->.
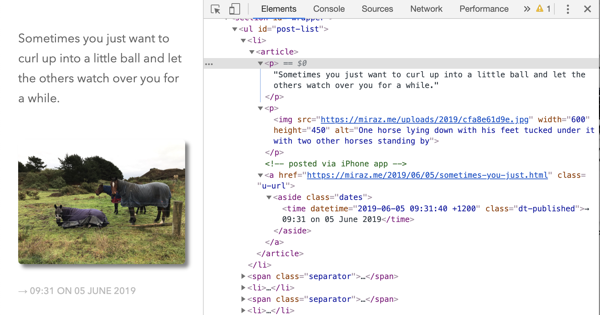
Photo posted from iPhone.
Micro.Blog creates HTML for blog posts
You can see that when I posted the photo and text from my iPhone, Micro.Blog automatically added HTML behind the scenes. Here's part of what it did. (I've had to break the lines up a bit.)
<p>Sometimes you just want to curl up
into a little ball and let the others
watch over you for a while.</p>

<p><img src="https://miraz.me/uploads/2019/cfa8e61d9e.jpg"
width="600" height="450"
alt="One horse lying down with its feet tucked under it
with two other horses standing by" /></p>
You can see that Micro.Blog added paragraph tags and also coding for the photo and its alt text. In addition, it added HTML to instruct the web browser to display the picture at a size of 600 pixels wide and 450 pixels high.
The HTML for images
Here's the minimum HTML for an image: <img src="[image address]" alt="[text that can replace the image. ]" />
You need the HTML tag for an image: img. Then you need to tell the browser where to find the image: src=“[address]" . Next you need to give the browser some alternative text that will only become visible if for some reason the picture isn't available: alt=“text that can replace the image. ]".
Note: sometimes people think this is a caption that will show up under the picture. That's not the case. Another tutorial will look at images and alt text more carefully.
Here's my example page with no styling applied to the image. It looks very flat and boring, and the top edge, where there's white cloud, just merges into the rest of the page.
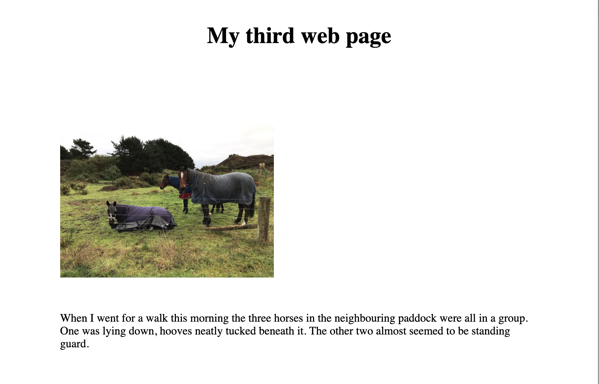
Photo on page before styling.
Use CSS to style images
This tutorial will help you use CSS to style images in blog posts, for example by setting background colours or borders or even applying shadows.
The tag to target is: img.
Borders enclose a space
Here's an example bit of CSS that puts a border around an image. It makes a heavy border so you can see it. This one's pretty ugly, but at least you can see what's going on.
img { border:5px solid black; }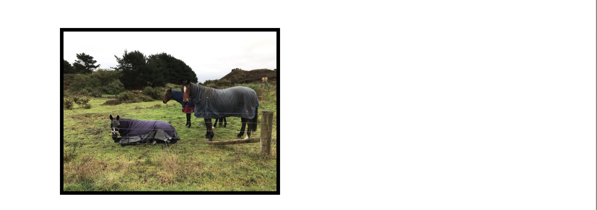
Thick black border round the image.
Actually, it does improve things because now you can see where the image ends and the page background begins.
This border is 5 pixels wide and is a solid black. It also hugs the image closely. If you're following along on your own HTML page try changing the number of pixels and the colour.
Note that the unit of measurement (px or pixels) must go directly after the number without a space between them.
Instead of solid try dashed or dotted or double.
Padding pushes the border away from the image
Sticking with this style: img { border:5px solid black; }, add another line to the img rule. This one adds padding, which pushes the border away from the image. Experiment with different amounts. img { border:5px solid black; padding:10px; } .
Background colour makes the border more interesting
Now let's add another line: img { border:5px solid black; padding:10px; background-color:green; }
Whew, it's a bit intense, but you get the idea. Good design is up to you, and not the point of this How-to tutorial.
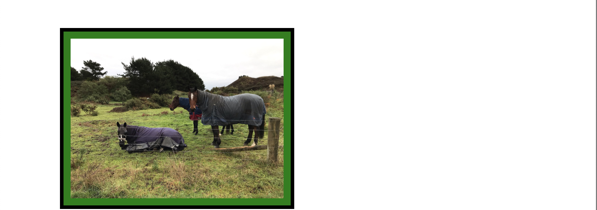
Image with a background colour and border.
Let's centre the image
The image is clinging to the left edge of the page, but may look better in the centre. We need two extra lines in the CSS.
img {
  border:5px solid black;
  padding:10px;
  background-color:green;
  display: block;
  margin:auto;
}
This tells the browser to display the image as a block, rather than just floating along in the middle of a sentence or paragraph. When we set margin:auto; we're telling the browser to put equal amounts of space on the left and right sides of the image. In a standalone web page you also need to set a width on the image, but Micro.Blog does that for us in blog posts. On the web page I'm using for these screenshots I also have this CSS in my img rule: height:225px; width:300px;.
Let's round the corners on the border
I've changed the background colour to an off-white and made the border thinner. But I also decided very rounded corners would look better than square corners. This is how I did it, with border-radius:20px;. Try changing the number of pixels and see what happens.
img {
  height:225px;
  width:300px;
  display: block;
  margin:auto;
  padding:10px;
  background-color: snow;
  border:3px solid black;
  border-radius:20px;
}
Let's add a box-shadow
To finish off this picture I'll add a box-shadow: box-shadow: 5px 5px 5px gray;. This specifies the colour as grey and says that the shadow should be 5 pixels offset horizontally, 5 pixels offset vertically (putting it to the right and below) and have 5 pixels of blur. Experiment with the numbers and colour to see what happens. Try making the first 2 numbers negative.
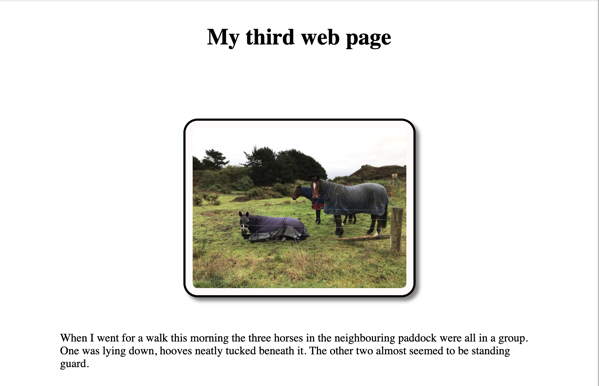
Styled image.
Warning: possible unexpected effects
I've styled this image by targeting the img tag. You may have other images baked in to your blog, such as a profile picture in the header. This styling is highly likely to affect that image as well. Every theme is different, but there should be a way to target images in posts while leaving other images such as profile pictures alone.
In the case of the blog for these tutorials I can target the post images by using .post-list img. At the time of writing, this blog was using the Default theme.
If you're not a CSS whiz you may be best to ask for help in working out how best to target images in a post while leaving other images unaffected.