Change the date format
Anyone can do this.
At the time of writing this blog uses the Default Theme. I have already customised it a little, by adding a strip of graphics across the top, and a few other small touches.
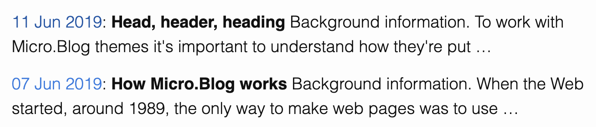
In the first screenshot below you can see the upper part of the Home Page. Note that the Title of the first item is preceded by a ⌘ and the title itself is a link. Below that is a date: Jun 11, 2019.
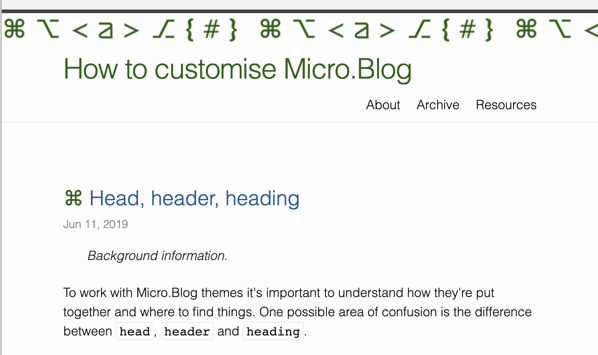
Top of the Home Page.
The second screenshot shows a single page — I clicked the link of the post title on the Home Page and am now viewing just the single post. Note that the Title of the post is no longer preceded by a ⌘ and the title itself is no longer a link. We still have the date: Jun 11, 2019.
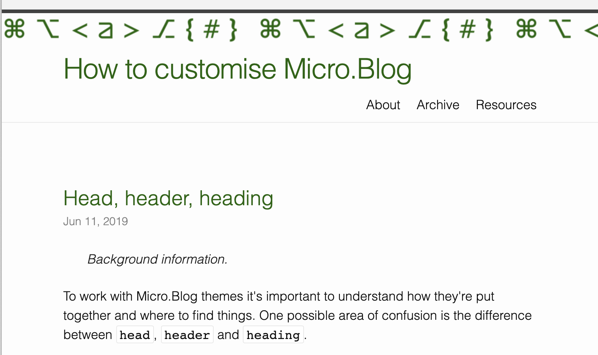
Top of a Single Post page.
In today's tutorial we'll look at how to change the format of that date. I prefer something like 11 June 2019
, but you may prefer some other different format.
We'll need to make the change — it's an easy one — in two places.
Edit the Theme files
I suggest visiting Add a favicon before working through this tutorial about dates.
To edit the Theme files:
- Click on the Posts link at the top of the behind-the-scenes area of your blog. You're taken to the page of your recent posts, and a set of navigation buttons is shown above your posts.
- Click on the Design button above the list of your posts. You're taken to the Design area of your blog.
- Scroll down past the available Themes and click on the Edit Custom Themes button. You're taken to a page where you can create a
New Themeor edit an existing Custom Theme. See also the instructions at Add a favicon. - Either create a new theme or click the name of an existing theme to edit it. In this tutorial I'll edit my
favicontheme. You're taken to a page that listsDefault Templatesat the bottom, templates for your selected theme above that and at the top any custom templates you have already created. In my case, theTemplates for Defaultrefers to templates for the theme namedDefaultthat I've selected for my blog. - Where you go next depends slightly on any custom templates you may have already created. Read on.
If you have already created a custom version of the theme file you need then edit that. Otherwise, select the theme file you need from the list of files available for your theme.
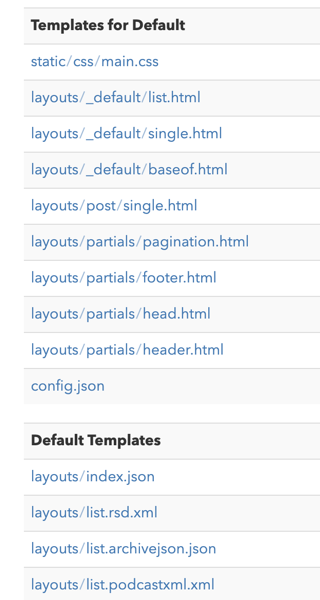
List of templates in Micro.Blog. The default Micro.Blog templates are at the bottom. Above that are templates for my selected theme which is called Default.
Edit the theme template for the Home Page
First we'll change the date format on the Home Page. Different themes might use different templates for things, but the Default Theme uses layouts/_default/list.html to determine how the Home Page will be presented.
Click on layouts/_default/list.html to open it for editing.
If this is the first time you've edited this file Micro.Blog creates a copy and adds it to the list of your Custom Templates. It also opens it for editing.
If you have already created that particular Custom template then click on it in the list to open it for further editing.
One of the things about Hugo, the system that Micro.Blog is based on, is that the templates are very readable, using words that are taken from the English language.
Look through the template until you come to a section like this. Note that I've broken up some of the lines to fit on this page.
<time class="dt-published"
datetime="{{ .Date.Format "2006-01-02 15:04:05 -0700" }}"
>{{ .Date.Format "Jan 2, 2006" }}</time>
Pay particular attention to this part: .Date.Format "Jan 2, 2006", especially Jan 2, 2006 . That's the part you need to carefully edit.
Make sure when you edit templates to only change the small part you need to change. If you accidentally obliterate a speechmark " or other punctuation for example, your blog may stop working correctly.
In my case, I prefer the 02 January 2006 format to Jan 2, 2006.
Being very careful to only replace the exact part, I insert my new format.
Note: you're not putting in today's date, you're just reordering the date that's already there.
Click the Update Template button to save your changes.
Now go to the Home Page of your blog and refresh. Check that nothing has broken and also that your change has taken effect.

My new Home Page date format.
There are reference document for Hugo. Hugo Date and Time Templating Reference explains the possible way to format a date.
If all has gone well then the date format on the Home Page now reflects your choice. However, open your blog post into its own page or visit the Archives page and you'll see they don't reflect the change.
Edit the theme template for the single blog post page
Click to edit layouts/post/single.html. Note: don't confuse this with the similarly named layouts/_default/single.html. You need the one with post in its name.
Follow the steps above to change the date format and remember to save the edited template.
Now go to the page for one single blog post and refresh. Check that nothing has broken and also that your change has taken effect.
Edit the theme template for the Archive page
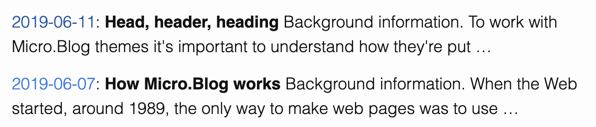
On this blog the Archive page used an entirely different date format: 2019-06-11.
This format is particularly confusing. In the US it would be read as 11 June, while in some other parts of the world, such as the UK and New Zealand it will be read as 06 November. Other countries may interpret it some other way.
Click to edit layouts/list.archivehtml.html. Note: this is at the bottom of the templates list page in the Default Templates section.
Follow the steps above to change the date format and remember to save the edited template.
Now go to the page for the Archive page and refresh. Check that nothing has broken and also that your change has taken effect.
Archive page original date format.
Archive page clearer date format.