How Micro.Blog works
Background information.
When the Web started, around 1989, the only way to make web pages was to use HTML.
After a while, CSS was introduced to provide layout, colours and the like by hooking on to HTML elements. The HTML gave the page structure and CSS made that structure pretty.
Since then all kinds of technologies have popped up behind the scenes on web pages that allow all kinds of amazing things. Even so, HTML and CSS are fundamental.
HTML can only describe the structure of a page — this bit's a heading, this bit's a link — it can't actually do any work. To automatically create a list of posts, such as your blog's Archive, or to automatically add a publication date, or even to assign a basic structure where you only need to fill in the new information from your blog entry, a web site needs something else.
Some systems, such as WordPress, use a database and a language called PHP.
Micro.Blog uses Hugo
Micro.Blog uses a system of templates based on Hugo.
Hugo is a general-purpose website framework. Technically speaking, Hugo is a static site generator. Unlike systems that dynamically build a page with each visitor request, Hugo builds pages when you create or update your content. Since websites are viewed far more often than they are edited, Hugo is designed to provide an optimal viewing experience for your website’s end users and an ideal writing experience for website authors.
Micro.Blog's Hugo templates are collected together in Themes. Each Theme contains several template files that incorporate HTML and special codes, and rely on CSS for display.
There are also several default templates that are special to Micro.Blog.
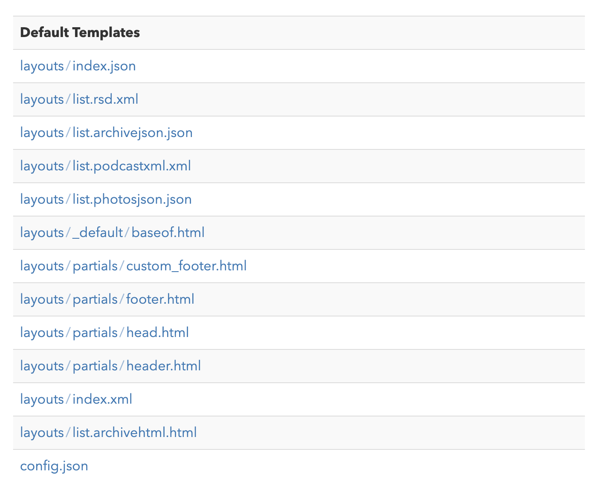
List of Default Templates in Micro.Blog.
Here's what one of those template files looks like.
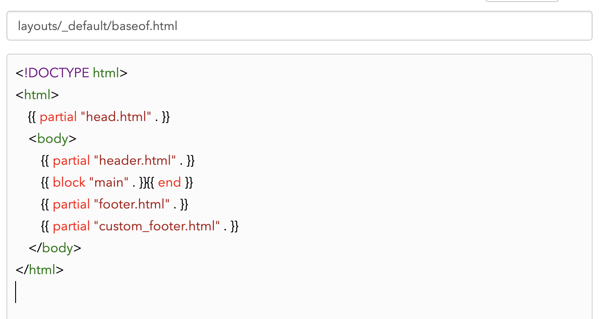
Baseof.html template in Micro.Blog.
That file sets up the HTML framework and then says to go get other files such as head.html and others.
If we go look at other default template files such as single.html we'll see that also includes HTML. Some other default template files don't contain anything.
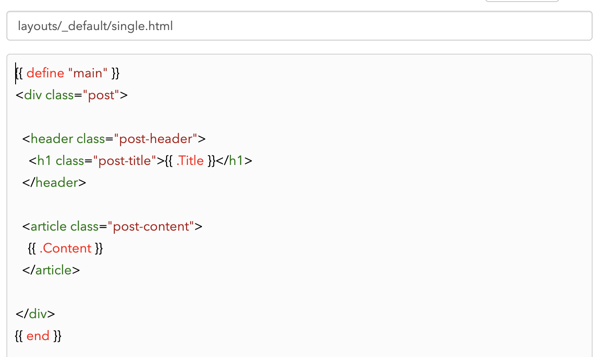
The single.html default template file.
Themes also use template files
When you choose a Theme an additional set of template files is brought in. Those template files are like the default files but introduce their own capabilities and layouts. Theme templates override default templates but if they're lacking something then the default templates fill in the gap.
Custom Templates allow you to include your own ideas
On top of those two layers of templates is an optional third layer. You can make changes to how things should work by creating a Custom Template and then your changes will win
over the other template files.
A tiny concrete example
On this tutorials blog at the time of writing there is a ⌘ character in front of every post title. Rather than remembering to type it every time I added it to a custom template. It's circled in the screenshot below.
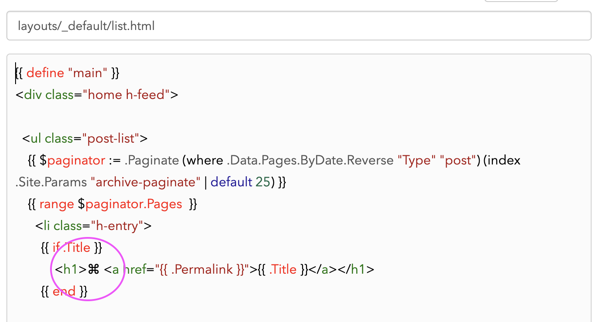
My added character before headings in Micro.Blog.
One splendid thing is that if you've learned a little about HTML and CSS (I hope the previous tutorials have helped) then these templates are pretty readable.
Coming up are tutorials on working with Custom Templates.
Use Alt Text (image Description) because it's the right thing to do
Everyone should do this.
When you add an image to a blog post — a photo, for example — there's something very simple you can do to make the web a better place: you can add Alt Text to your image. From here on I'll talk about photos, as they're the most likely images most people will add.
Alt text replaces the photo
Not everyone can see photos you upload. One key group of people who won't see your photos is those who are blind. Others could be those folks on very slow or expensive Internet connections, or when there's some kind of mistake and the photo just doesn't show up.
It's only polite to tell people what the photo represents if they can't see it for themselves.
You do this by adding Alt Text, which is really easy.
Alt text is sometimes called Description
Sometimes folks refer to Alt Text as a Description, maybe because more bloggers are likely to understand that term.
The key thing to remember is that alt or alternate
text replaces the photo, it doesn't just describe it.
Here's the difference: imagine you've made a website about elephants and you have cute little elephant buttons to go to the top of the page, or the next section. 🐘 You'd describe
the elephant as being big, grey, with a trunk and so on. But the point of these particular elephants is to go to the top of the page or the next section, so the alt text would be: Top of page
or Next section
. The alt text replaces the picture. The distinction's a bit blurrier with photos on a blog, but I owe it to you to clarify that point in this tutorial.
How to add Alt Text in the iOS app
- Add a photo to your Micro.Blog post in the usual way. After the photo's attached tap once on it. Choose Add Description from the choices that appear. Another window appears titled Accessibility Description.
- Enter your
Alt Textand finish by tapping the Add button. TheAlt Textis sent along with the photo. Micro.Blog then adds the correct coding for the photo and theAlt Textto your blog post.
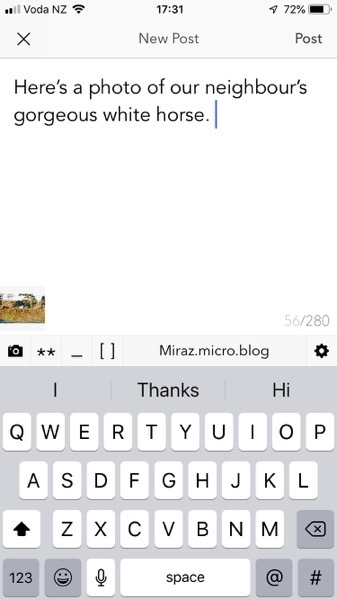
Add a photo in the iOS Micro.Blog app.
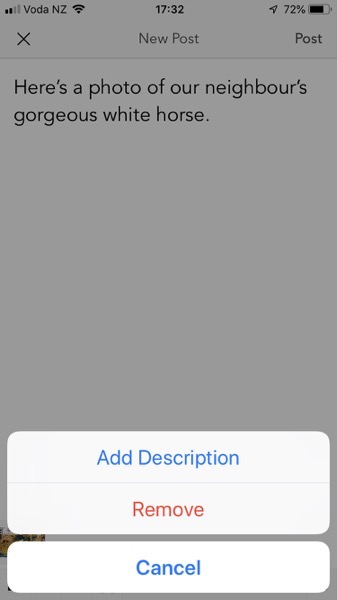
Add Description in the iOS Micro.Blog app.
Here's part of the coding Micro.Blog created from my actual blog post. I've broken it up to fit well on this page:
<p><img
src="https://miraz.me/uploads/2019/31b6cf987a.jpg"
alt="White horse standing in the sun near a tree
in brown coloured paddocks."></p>
The Alt Text I supplied has been added to the coding for the image.
Now if the photo somehow goes missing the Alt Text will show up instead.
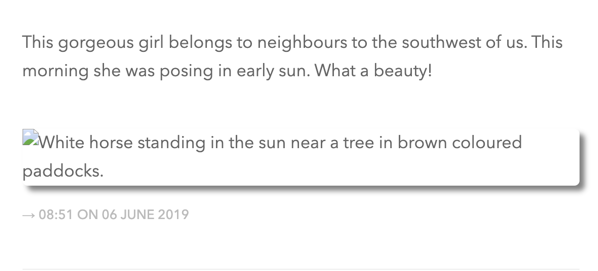
Alt Text is visible because the image is missing.
How to add Alt Text in the web interface
- While writing a new Post in the web interface add a photo using the camera icon button. The file name of the photo appears below the composing area.
- Post your blog entry. The post is published and the blog entry disappears from view.
- Click the Posts link at the top of the page. A page showing your recent blog entries appears.
- Scroll down until you see the Edit button for your post.
- Click the Edit button. Your post is opened up and able to be edited.
- Enter appropriate
Alt Textfollowing the example above. See also the screenshots below. - Click the Update Post button to update your blog post to include the people-friendly alternate text.
This rather long-winded procedure is how it works as at June 2019. With any luck half a dozen steps will be removed. It's good Internet citizenship to include Alt Text.
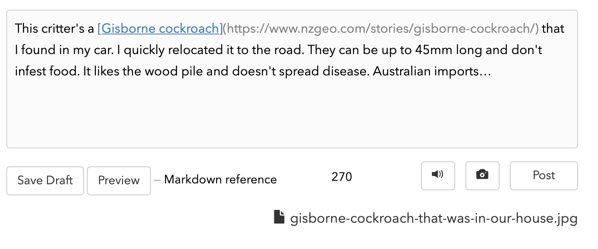
Using the web, I've added a photo to my blog entry. Then I Post the entry.

Use the Posts link at the top of the page to see a list of your latest posts.
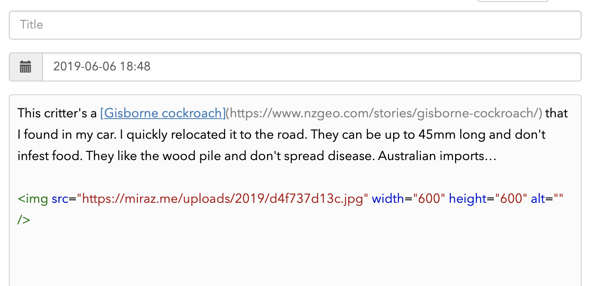
Edit the post and add Alt Text — it's missing in this screenshot.
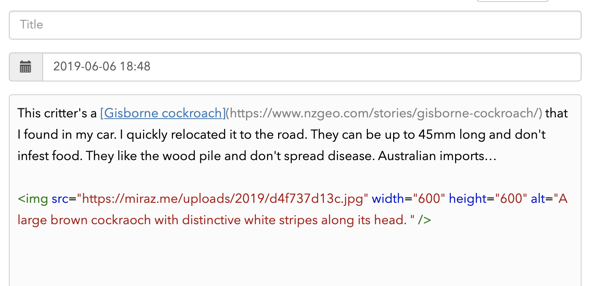
The edited post now includes Alt Text. Watch the syntax colouring which will alert you to coding mistakes.
Alt Text is not a caption
Sometimes people say something like: I added a Description but it's not showing up
. Alt Text (Description) doesn't show up if the picture does.
If you hand-code a blog page with HTML or perhaps Markdown then you can arrange the text and photos as you wish, including putting text captions below photos. If you use the iOS app or add your blog entry via the web interface then photos are simply put at the end.
These tutorials have been hand-coded in HTML with pictures placed where I want them.
Hide things with CSS
Anyone can do this.
Sometimes things come with the Theme you choose, but you don't want them. One example is Also on Micro.Blog in the navigation area at the top of the page.

Also on Micro.Blog.
You could fiddle with the Theme files, but a quick way to do it is to use your stylesheet to hide that item: .cta { display: none; }.

Also on Micro.Blog hidden with CSS.
How to find the right target for the style
Use the Web Inspector to discover what tag or class is relevant. See Let's investigate a web page for more detail.
The blog I took the screenshot from (my own) uses the Marfa theme.
How to style an image in a post
You can do this.
Suppose you pull out your iPhone, take some photos and decide to send one picture there and then to Micro.Blog. You write a few words to go with the picture in the Micro.Blog iPhone app, attach the photo, include alt text (known as a description) and send.
There's no HTML in the process and probably no Markdown. It's very easy: write a few words, add the photo and alt text and post. It's simple (and one of the things I like about Micro.Blog).
My screenshot shows an example of a photo I posted from my iPhone, along with the coding it ended up with behind the scenes. Later on I edited the blog post to include the HTML comment: <!-- posted via iPhone app -->.
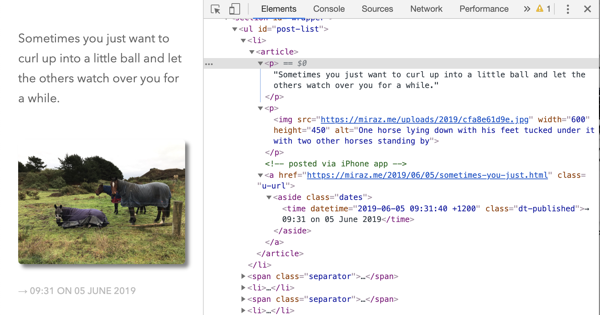
Photo posted from iPhone.
Micro.Blog creates HTML for blog posts
You can see that when I posted the photo and text from my iPhone, Micro.Blog automatically added HTML behind the scenes. Here's part of what it did. (I've had to break the lines up a bit.)
<p>Sometimes you just want to curl up
into a little ball and let the others
watch over you for a while.</p>

<p><img src="https://miraz.me/uploads/2019/cfa8e61d9e.jpg"
width="600" height="450"
alt="One horse lying down with its feet tucked under it
with two other horses standing by" /></p>
You can see that Micro.Blog added paragraph tags and also coding for the photo and its alt text. In addition, it added HTML to instruct the web browser to display the picture at a size of 600 pixels wide and 450 pixels high.
The HTML for images
Here's the minimum HTML for an image: <img src="[image address]" alt="[text that can replace the image. ]" />
You need the HTML tag for an image: img. Then you need to tell the browser where to find the image: src=“[address]" . Next you need to give the browser some alternative text that will only become visible if for some reason the picture isn't available: alt=“text that can replace the image. ]".
Note: sometimes people think this is a caption that will show up under the picture. That's not the case. Another tutorial will look at images and alt text more carefully.
Here's my example page with no styling applied to the image. It looks very flat and boring, and the top edge, where there's white cloud, just merges into the rest of the page.
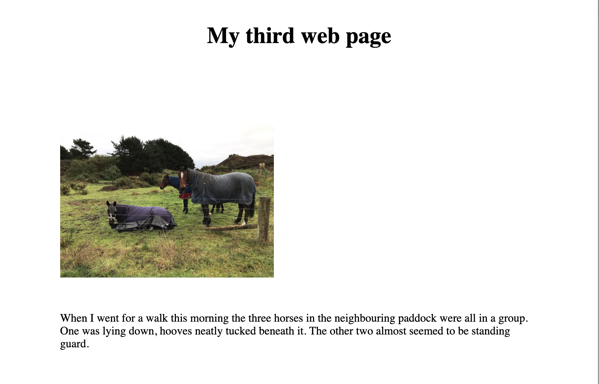
Photo on page before styling.
Use CSS to style images
This tutorial will help you use CSS to style images in blog posts, for example by setting background colours or borders or even applying shadows.
The tag to target is: img.
Borders enclose a space
Here's an example bit of CSS that puts a border around an image. It makes a heavy border so you can see it. This one's pretty ugly, but at least you can see what's going on.
img { border:5px solid black; }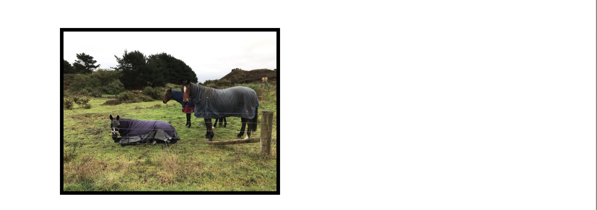
Thick black border round the image.
Actually, it does improve things because now you can see where the image ends and the page background begins.
This border is 5 pixels wide and is a solid black. It also hugs the image closely. If you're following along on your own HTML page try changing the number of pixels and the colour.
Note that the unit of measurement (px or pixels) must go directly after the number without a space between them.
Instead of solid try dashed or dotted or double.
Padding pushes the border away from the image
Sticking with this style: img { border:5px solid black; }, add another line to the img rule. This one adds padding, which pushes the border away from the image. Experiment with different amounts. img { border:5px solid black; padding:10px; } .
Background colour makes the border more interesting
Now let's add another line: img { border:5px solid black; padding:10px; background-color:green; }
Whew, it's a bit intense, but you get the idea. Good design is up to you, and not the point of this How-to tutorial.
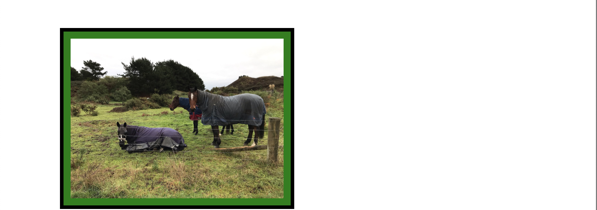
Image with a background colour and border.
Let's centre the image
The image is clinging to the left edge of the page, but may look better in the centre. We need two extra lines in the CSS.
img {
  border:5px solid black;
  padding:10px;
  background-color:green;
  display: block;
  margin:auto;
}
This tells the browser to display the image as a block, rather than just floating along in the middle of a sentence or paragraph. When we set margin:auto; we're telling the browser to put equal amounts of space on the left and right sides of the image. In a standalone web page you also need to set a width on the image, but Micro.Blog does that for us in blog posts. On the web page I'm using for these screenshots I also have this CSS in my img rule: height:225px; width:300px;.
Let's round the corners on the border
I've changed the background colour to an off-white and made the border thinner. But I also decided very rounded corners would look better than square corners. This is how I did it, with border-radius:20px;. Try changing the number of pixels and see what happens.
img {
  height:225px;
  width:300px;
  display: block;
  margin:auto;
  padding:10px;
  background-color: snow;
  border:3px solid black;
  border-radius:20px;
}
Let's add a box-shadow
To finish off this picture I'll add a box-shadow: box-shadow: 5px 5px 5px gray;. This specifies the colour as grey and says that the shadow should be 5 pixels offset horizontally, 5 pixels offset vertically (putting it to the right and below) and have 5 pixels of blur. Experiment with the numbers and colour to see what happens. Try making the first 2 numbers negative.
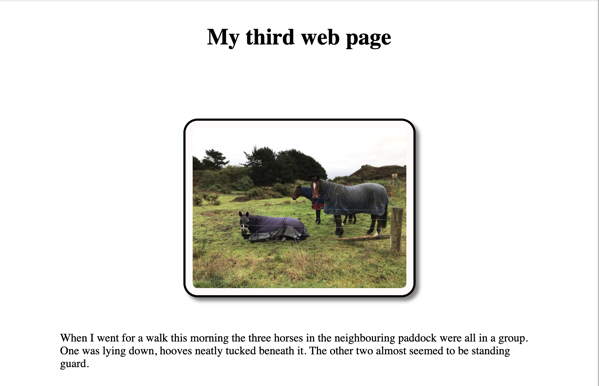
Styled image.
Warning: possible unexpected effects
I've styled this image by targeting the img tag. You may have other images baked in to your blog, such as a profile picture in the header. This styling is highly likely to affect that image as well. Every theme is different, but there should be a way to target images in posts while leaving other images such as profile pictures alone.
In the case of the blog for these tutorials I can target the post images by using .post-list img. At the time of writing, this blog was using the Default theme.
If you're not a CSS whiz you may be best to ask for help in working out how best to target images in a post while leaving other images unaffected.
Links and how to style them
Anyone can do this.
Tim Berners-Lee wrote the first proposal for the World Wide Web in March 1989. By the end of 1990, Tim Berners-Lee had the first Web server and browser up and running at CERN, demonstrating his ideas. [Source: How the Web began.]
The point of it all was to connect documents together, using a hypertext link.
The idea of hypertext is that you can click on some words (the anchor) and be magically transported to the document they refer to (the target).
To show that you could click on the words they would be written in blue text, with an underline. That is still something of a default today, some 30 years on.
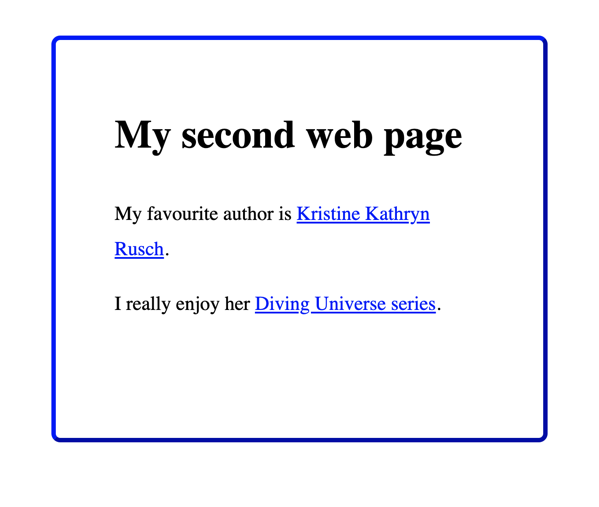
Hypertext links on a web page are blue and underlined.
Links can be in one of several states
Making a link is straightforward, if you take it step by step, as already explained in Some handy HTML tags: lists, quotes and links. But here’s some extra information you need to know if you aim to customise your Micro.Blog: links can be visited or unvisited. They can also be active, and you can hover over them.
Of those, visited, unvisited and hover are the ones most usually styled with CSS.
In my screenshot above I have not yet clicked on either of the links. They are unvisited and appear blue and underlined.
After clicking the second link and returning to My second web page though that link is now visited. Now that second link shows up in red. That’s a handy clue for the visitor that they’ve already visited the target of that link.
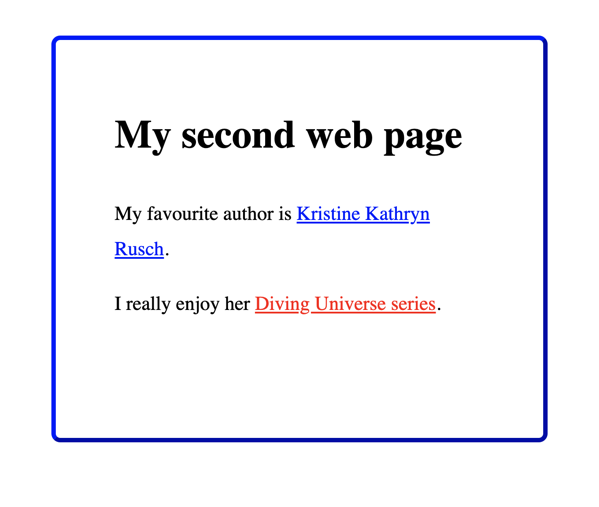
This visited link appears in red.
The hover state is for when you are hovering your mouse over a link. Sometimes people use that to bring up additional information.
How to style links with CSS
A link in HTML looks like this: <a href=“https://kriswrites.com">Kristine Kathryn Rusch</a>. The a stands for anchor and is the part the CSS must refer to.
We could make an unvisited link green like this: a { color:green; }.
A visited link uses a CSS feature we haven’t talked about before — it puts a colon outside the curly braces: a:visited { color:gray; }. [Note the spelling of ‘gray’ and the colon between the a and visited.]
In the next screenshot (which refuses to show the mouse pointer) I am hovering over the first link. In the styles I removed the underline from all links, but when I hover my mouse over a link the underline comes back.
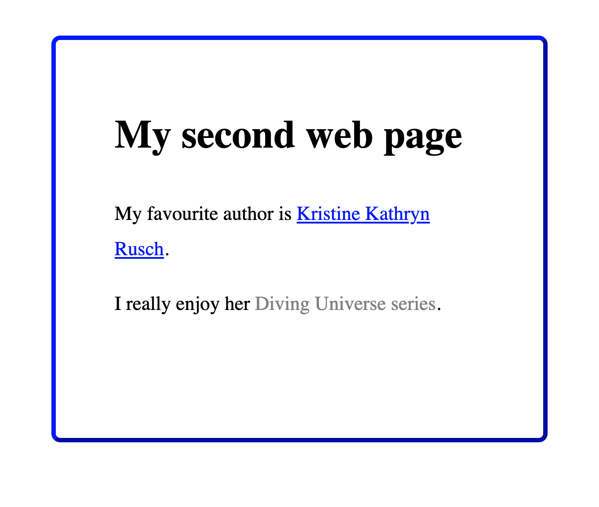
When I hover over the first link the underline reappears. Notice how it’s gone from the second link.
Here’s the CSS rules that remove the underline until my mouse hovers over the link, and change the colour of links I’ve already visited.
a {
  color:blue;
  text-decoration: none;
}

a:visited {
  color:gray;
}

a:hover {
  text-decoration: underline;
}
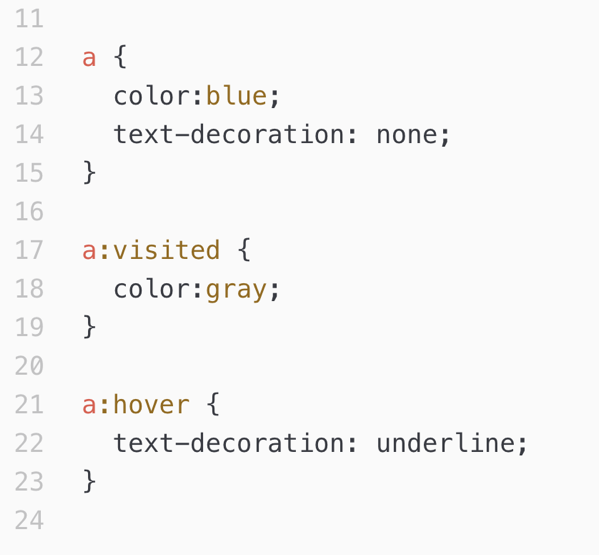
CSS styles for links.
HTML and CSS comments are extremely useful
Background information.
What the heck was I thinking? What was that about? Why did I do that?
These are questions that developers, web designers and even humble bloggers always ask themselves somewhere down the line — days, months, years later when they go back to look at something they did some time ago. We all think we’ll remember, but we don’t.
That’s why, when you change something in the HTML coding, or when you make a custom stylesheet, it’s great insurance to leave yourself a note. It only takes a second.
HTML comments
When you’re writing HTML (see Start coding HTML, plus: what is HTML?) you should add in comments using this coding: <!– your comment here –> . The screenshot below shows an example.

HTML comment example.
Comments are readable by humans if they look behind the scenes of a web page, but they have to go looking. Web browsers don’t display comments as part of the page. Leave yourself good notes when it’s relevant but never include sensitive information such as passwords.
CSS comments
It’s possible CSS comments are even more important than HTML comments. CSS can be so complex — think the Labyrinth the Minotaur was trapped in or the Gordian Knot — that a guide is essential.
CSS comments take this form: /* your comment here */ .
Again, these comments aren’t displayed on the web page but someone who goes looking could read them.
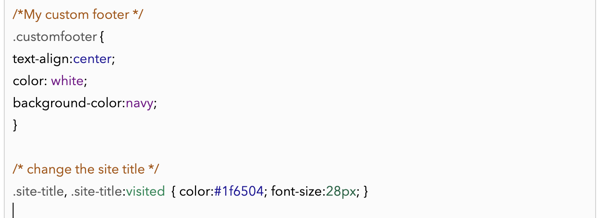
Note how I’ve used comments to tell me what the CSS Rule is for and what it does.
What you need to know about CSS to customise your Micro.Blog blog
You can do this.
When you choose a Theme it will have its own stylesheet (perhaps several) which determine how your blog will look and feel. As briefly explained in an earlier tutorial there are rules that determine how various stylesheets interact. Usually though, anything you add to your own Custom Stylesheet should win
.
Add your own styles
To add your own styles:
- Go to the Design section for your blog.
- In the Custom theme: section click on the Edit CSS button. A new page opens up with a box for entering CSS rules.
- Enter the CSS you want for your blog.
- Save your changes with the Update CSS button.
- Visit your blog and Refresh to see the changes. Note: it can sometimes take a minute or two for changes to take effect.
How to find out what to change
That's all very nice in theory but most of the time you need to figure out exactly what it is you want to style. You'll see something on your blog that just doesn't look right to you, but how do you know which element you need to fix
?
Here's the top part of this tutorials blog. Noe, at the time of writing this blog was using the Default theme. Other themes may do something different.
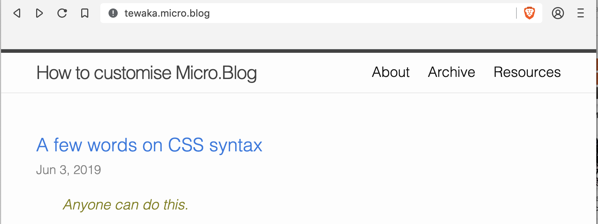
Before — top of page on tutorials blog.
Here are things I might potentially want to change:
- The colour of the name:
How to customise Micro.Blog
. CSS will do that. - The colour of the links to pages:
About, Archive, Resources
. CSS will do that. - The colour of the tutorial heading:
A few words on CSS syntax
. CSS will do that. - The format of the date:
Jun 3, 2019
. I prefer a format like03 June 2019
. CSS can't change the nature of something like that, but I could make it italics, or bold, or a different colour. CSS is good for that kind of thing. To change the date format needs different skills that will come up later in these tutorials. - The colour of the note:
Anyone can do this
. CSS will do that.
Remember, CSS allows you to change things like fonts, colours, borders, font sizes. The date is added by Micro.Blog itself and the format is part of the underlying mechanics. It's actually relatively easy to change its format, but for that we need to go into the Theme files. We can't do it just with CSS, although we could force the month name to be in uppercase (Capitals), lowercase or as it is now with the first letter capitalised.
Let's change the formatting of the blog name
One step at a time … Let's start by changing the formatting of How to customise Micro.Blog
. How can we possibly know what HTML element to write a rule for in the custom stylesheet?
We could guess that it's an h1, but maybe it's not. That's where the Web Inspector comes in.
The Web Inspector was briefly mentioned in Let's investigate a web page. It's incredibly useful for working out what styles are applied to any particular bit of a blog page and for experimenting with how the style could be changed. Use it. The more you use it the easier things will become. See screenshots below the list of steps.
- Control click near the element you want to inspect and choose
Inspect(or similar, depending which browser you're using). The Inspector pane or window opens up and may even highlight the element you want to inspect. - In my screenshot below the Inspector has highlighted the appropriate line of the HTML coding, but it's folded up the code and I must click the disclosure triangle at the left end of that line to see more. I do that and then can click on the actual line I need. It turns out that title isn't an
h1after all. - After clicking on the element you need by reading through the HTML code, look at the part of the Inspector that shows the CSS coding. I can see that on my blog it reads
.site-title, .site-title:visited { color: #424242; }. Also, a little further down, are some rules for.site-titlethat cover the font and line-height and so on. See the screenshot below where I've clicked on the colour square to choose a different color. Remember, you can change the CSS here to experiment, but it only actually affects the page in your own browser on your own screen. - Now you know that
.site-titleis the element to target when you write your CSS rule for your custom stylesheet. After messing around in the Inspector I've decided that for this tutorial anyway I want to change the colour to green and make the font bigger. I write this rule:.site-title { color:#1f6504; font-size:28px; }. Now I need to put that in the Custom Stylesheet on the blog itself to make it real for every visitor. Follow the steps above in theAdd your own stylessection. - Save the changes and Refresh your page. It can take a few minutes for the changes to take effect. With any luck, that worked and you can congratulate yourself and move on to the next thing.
- Uh oh. On my first attempt it didn't work. The font was bigger but the colour didn't change. Unfortunately, that's life with CSS. If that happens, you can:
- troubleshoot and try again
- abandon the idea
- turn to other Micro.Bloggers for help.
After some thought I realised why my custom style didn't work. Unfortunately the screenshot below obscures the full rule for the site title, although my text above reflects it accurately. In short I'll need to explain this in full elsewhere in these tutorials, but the Theme's stylesheet set both links and visited links to a dark colour. My custom rule didn't apply to visited links which is what this one was at this time on my website. I've been using, writing and even teaching about CSS for nearly a couple of decades. There's plenty to trip anyone up in CSS.
In step 4 above I should have used this rule: .site-title, .site-title:visited { color:#1f6504; font-size:28px; }.
Screenshots
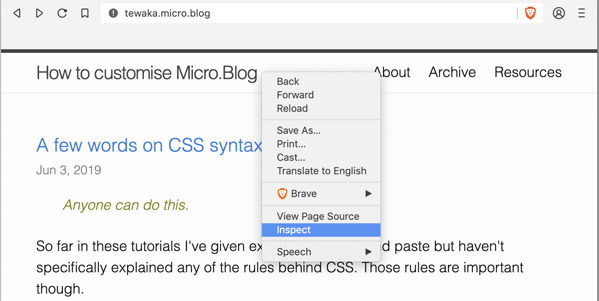
Inspect a web page.
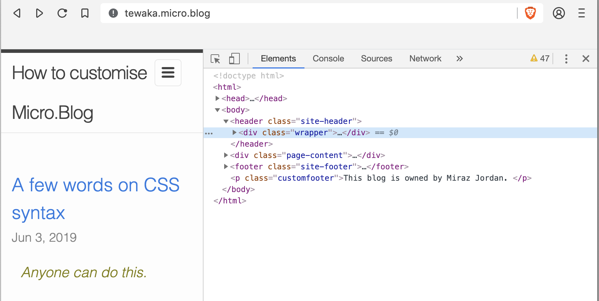
The Inspector opens in a new pane in the Brave browser. One line is highlighted but I must click the disclosure triangle at the left end of that line to see more.
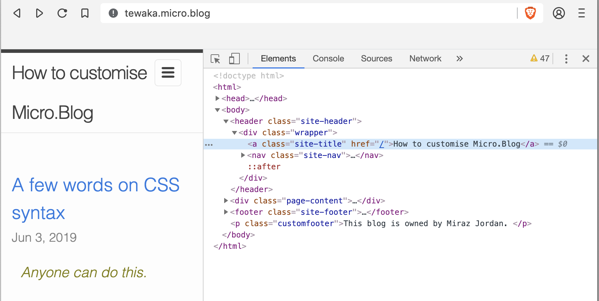
Site title link in the Inspector.
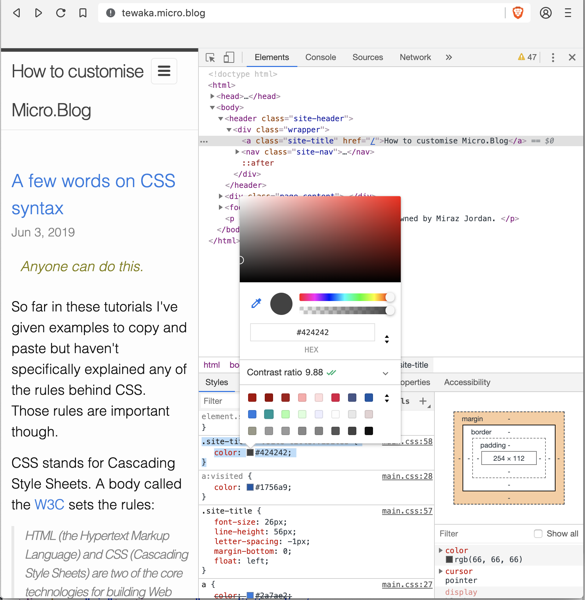
Read the CSS for an element in the Inspector.

Corrected site title CSS rule.

Now my site title is displayed larger and in green.
Get help
If you want to customise your blog but can’t see what styles to change or why things aren’t working as expected, then ask on the Micro.Blog Slack Design Channel. People there are often very happy to help. Always include a link to your blog so they can take a look for themselves at what’s going on. Remember to give feedback too, such as letting helpers know that the change worked.
Some handy HTML tags: lists, quotes and links
Anyone can do this.
Headings are important, by varying degrees
There are actually 6 levels of headings, depending on how important they are. Thinks of a legal document with clauses and subclauses and so on. Most people would only use a couple of levels. In blogging you probably won’t use headings at all, but later on, if you want to make changes to your blog’s theme, then you need to at least know about headings.
The heading level 1 tags are <h1> </h1> .
The heading level 2 tags are <h2> </h2> .
I imagine you can now figure out how it works for the other 4 levels.
H1 is more important than h2 and so on.
Here’s an example: <h1>A most important heading indeed </h1>
A best practice writing note: When people read longer documents that have headings they scan down the headings till something catches their interest then read that part. Think of headings more as headlines that summarise in a few words the paragraphs that follow. An example from this document: originally I wrote a heading called Spaces and line breaks
. Then I improved it to be more helpful: Multiple spaces and line breaks in HTML are ignored
.
Make a list of things
Lists can be handy things, even in blog posts. Here’s a partial list of things to pack for a trip: phone, charger, passport
. That list has 3 items. The order of the items is unimportant, so we need an unordered list.
Lists have 2 parts: the instruction to the browser that a list is coming up and again when it’s ended. That instruction also tells the browser what type of list it is. So, an unordered list uses the tags: <ul> and </ul>. The browser will automatically add bullet points to the items.
The second part is that inside the ul tags we need to put all the items, but wait! We also need to put list item tags around each item: <li> and </li>.
Here’s my list after I’ve coded it up: <ul>
<li>phone</li>
<li>charger</li>
<li>passport</li>
</ul>
Here’s what the browser shows:
- phone
- charger
- passport
A recipe is a great example of an ordered list where a sequence or steps is important.
While the list items still need to be coded up with li tags the ordered list tags are simply <ol> and </ol>. Here’s the ordered list:
<ol>
<li>phone</li>
<li>charger</li>
<li>passport</li>
</ol>
Here’s what the browser shows, with magically added numbers:
- phone
- charger
- passport
Quotes and blockquotes
Very often bloggers want to quote something from someone else. Depending how long it is, you could just put the quote inline — in the middle of your sentence — or do it as a blockquote if it’s long.
Here’s what you need: <q> and </q> or <blockquote> and </blockquote>.
For example:
Manton says Micro.Blog is <q>the fastest way to blog</q>.
Supposing your stylesheet has a rule like q {font-style:italic;} then your inline quote might come out like this:
Manton says Micro.Blog is the fastest way to blog.
<p>Manton also says </p> <blockquote><p>Today’s social networks are broken. Ads are everywhere. Hate and harassment are too common. Fake news spreads unchecked.</p><p>There’s a better way: a network of independent microblogs. Short posts like tweets but on your own web site that you control. </p></blockquote>
That blockquote should come out like this:
Manton also says
Today’s social networks are broken. Ads are everywhere. Hate and harassment are too common. Fake news spreads unchecked.There’s a better way: a network of independent microblogs. Short posts like tweets but on your own web site that you control.
Remember to acknowledge the source of quotes, whether they’re short or long. Source of Manton’s quotes.
Make a link
Links are where you can click on a word or phrase and automatically be taken to that web page, for example, the words just above Source of Manton’s quotes
.
In the link above, those words are known as the link text.
Links always have two parts:
- the link text (an image could also be a link). Example:
Source of Manton’s quotes. - the URL (web address) that the link takes you to. Example:
https://micro.blog/.
In Micro.Blog you can write your blog posts just as text, if there’s nothing special like a link. Or you can use Markdown or HTML, or a mix of both. I’m not a huge fan of Markdown, but I will concede that writing a link with Markdown is easier for most people than writing it with HTML. So, even though this is an HTML tutorial, not a Markdown tutorial, I’l show you both ways, using the Source of Manton’s quotes
example from above.
Here’s how to do it in Markdown, with square brackets around the link text and round brackets round the URL and no gap between:
[Source of Manton’s quotes](micro.blog/)
Micro.Blog takes that Markdown code and transforms it into HTML, which will then look like this:
<a href=“https://micro.blog/">Source of Manton’s quotes</a>
Here’s a screenshot that shows how the HTML coding for a link looks with syntax colouring. That makes it easier to see what’s going on.

How the HTML coding for a link looks with syntax colouring.
A few words on CSS syntax
Anyone can do this.
So far in these tutorials I've given examples to copy and paste but haven't specifically explained any of the rules behind CSS. Those rules are important though.
CSS stands for Cascading Style Sheets. A body called the W3C sets the rules:
HTML (the Hypertext Markup Language) and CSS (Cascading Style Sheets) are two of the core technologies for building Web pages. HTML provides the structure of the page, CSS the (visual and aural) layout, for a variety of devices. Along with graphics and scripting, HTML and CSS are the basis of building Web pages and Web Applications.
How CSS works
A stylesheet contains a set of rules that tell a web browser how to render a web page. Mostly render means display visually, but it could also mean how a computer voice should read aloud. The styles are hooked in
to HTML elements which give information about the structure of a web page by using tags.
For example, the stylesheet might say that any text which is a paragraph
should be a certain colour, a certain size, a certain line-height, a certain font-family (if possible). The style-sheet could suggest how far away from the paragraph above or below it should be, how wide, what background-colour it should have. There are lots of possibilities.
The same goes, of course, for all HTML elements, such as headings, lists, emphasis and many elements these tutorials don't even mention.
CSS makes suggestions, not immutable laws
One big difference from print is that a printed page can be defined exactly whereas a page to be viewed on a screen is affected by numerous variables over which the designer has no control. For example, a web page could be viewed on a small phone, a huge monitor, with tiny text or huge text, on brand new and high-end equipment or junky old poor quality equipment.
Those and other reasons are why styles on web pages are really just suggestions — you can't assume that what you come up with is exactly how readers will see it.
The web browser is an intermediary too and may be better or worse at handling your instructions.
CSS syntax rules
A stylesheet is a series of rules written one after the other. A rule has one or more declarations.
The rule starts by saying which HTML element or elements it should be applied to, and then the group of declarations is put inside curly braces. See below for an example.
Declarations can all be written on one line or each on its own line. Each declaration starts with a selector followed by a : and then a value and finished with a ;. Spaces and line breaks are optional.
Example fragment of a stylesheet:
body { color:black; }

h1, h2, h3, h4, h5, h6 {
  font-family:"Gill Sans", sans-serif;
  color:white;
  background-color:black;
  font-weight: bold;
  font-size:1.4em;
  margin-bottom: 1em;
}

p {
  color: navy;
  line-height: 1.2em;
  width:95%
  margin:auto;
}
Beware
Beware typos in your CSS as they can mess up what you're trying to do. For example, spell color and center the American way.
Don't forget the colons and semicolons.
Make sure to use curly braces and not the angle brackets that HTML requires or any other style of brackets.
CSS inherits values unless overridden
In the example above the text in the body of a web page (ie, all of it) is supposed to be black, but paragraphs are set to blue. The headings will inherit that black, but because the paragraph rule is more specific, paragraphs will be rendered in navy.
There can also be more than one stylesheet. How they all interact and what takes precedence is governed by several rules of engagement.
CSS can quickly become very complex
Luckily this course isn't designed to teach anyone how to be a web designer. CSS can make people tear their hair out, because it has many more features and rules than have been mentioned here and how all those things interact becomes quite complex and often hard to fathom in practise.
Your Custom CSS should win
One simple thing to keep in mind is that if you add your own custom CSS using the Micro.Blog web interface then that should override anything that is already in place for your blog through the Theme you've chosen.
Let's say, for example, that your Theme makes all level 1 headings blue but you'd like them to be green. You could add a Custom CSS rule that says h1 { color: green; } and that will make the change.
A few words on HTML syntax
Anyone can do this.
So far in these tutorials I've given examples to copy and paste but haven't specifically explained any of the rules behind HTML. Those rules are important though.
Different versions of HTML
HTML stands for Hypertext Markup Language. A body called the W3C sets the rules:
HTML (the Hypertext Markup Language) and CSS (Cascading Style Sheets) are two of the core technologies for building Web pages. HTML provides the structure of the page, CSS the (visual and aural) layout, for a variety of devices. Along with graphics and scripting, HTML and CSS are the basis of building Web pages and Web Applications.
Over the years HTML has changed and developed, with the rules of the language changing as the world changed. The grammar
or syntax
varies a bit, according to the standards, but some things stay the same whatever. This HTML tutorial by Dave Raggett from 2005 gives you a good basis.
How tags work
Each chunk of text in a document has to have HTML tags that point out to the web browser where that chunk of text starts and where it stops. There is an opening tag and a closing tag. Tags are written with angle brackets: < >. The closing tag includes a / at the start.
For example, here's a short paragraph of text. It needs paragraph tags around it. The paragraph tags are <p> </p> .
Hello world!
With HTML tags it turns into:
<p>Hello world!</p>
Multiple spaces and line breaks in HTML are ignored
When you're writing text and coding it up with HTML it doesn't matter how many times you press the Spacebar or Return key between words or sentences. Here are example sentence fragments and how they appear when the browser renders them. I typed:
The

quick   brown
fox
The quick brown fox
The
quick brown
fox
For all, the browser showed:
The quick brown fox
Interesting history
The Internet started back around the 1940s, but the Web was only invented around 1989. As Business Insider says:
The first web page went live on August 6, 1991. It was dedicated to information on the World Wide Web project and was made by Tim Berners-Lee. It ran on a NeXT computer at the European organisation for Nuclear Research, CERN.
Things were very different 30 years ago with home computers barely a thing. Chances were you'd have seen the first web page a lot like this.
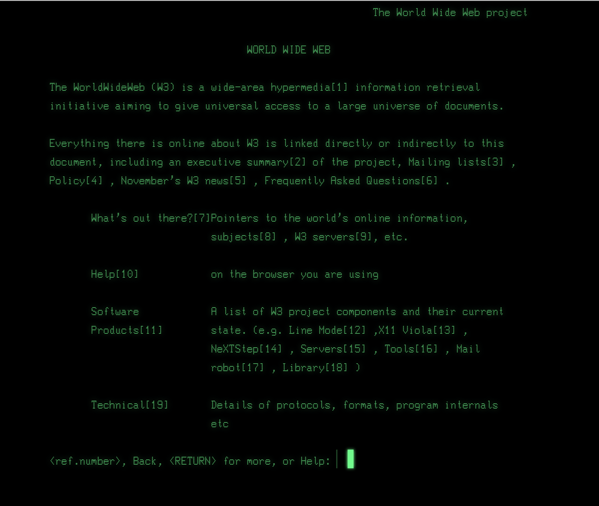
Web line mode simulator at CERN.
We've come a long way since then, thank goodness.
Style your custom footer
You can do this.
Back in Add a footer you added a footer to your blog, but maybe you removed it again as it probably looked pretty terrible. In this tutorial we're going to add a footer and use CSS to make it look good. Buckle up!
Add a styleable Custom Footer
- Go to the Design section for your blog.
- In the Custom theme: section click on the Edit Footer button. A new page opens up with a box for entering coding for a Footer.
- Enter what you want in the Footer, but add paragraph tags and a class. See the example below that you can copy and paste then edit to put in your own name.
- Save your changes with the Update Footer button.
- Visit your blog and Refresh to see the changes.
Here's an example footer. This time, instead of adding the class to a span tag we add it to the paragraph tag.
<p class="customfooter">This blog is owned by Miraz Jordan. </p>
When you visit your blog and scroll to the bottom of the page you should see the text, probably in black and hanging around at the left edge of the page.
Tip: here's a quick way to zip around the web page. Hold down the fn key on your keyboard and tap the right arrow to zip to the end of the page or the left arrow to zip to the top. Try it in other apps as well.

Unstyled custom footer.
Style the Custom Footer
- Go to the Design section for your blog.
- In the Custom theme: section click on the Edit CSS button. A new page opens up with a box for entering coding for a Footer.
- Enter the CSS you want for the Footer. See the example below that you can copy and paste. In the next tutorial we'll look at a bunch of things you can do with CSS.
- Save your changes with the Update CSS button.
- Visit your blog and Refresh to see the changes.
Here's a couple of things you can do to style the footer. I'll explain them below. For now, copy and paste them into your Custom CSS area.
.customfooter {
text-align: center;
color: white;
background-color: navy;
}
Note: center is spelled with an er
not an re
and colour is spelled with or
not our
.
Perhaps you can see what this CSS is doing. It aligns the text so it's centred across the page. Then it makes the text white and puts a navy background behind it. It may not be the world's most glamorous footer, but it's an improvement.

Styled custom footer version 1.
Try changing the colours. Try using the Web Inspector and change the colours there before you commit a colour to the Custom CSS area.
When you just want some bold or italics, not emphasis
Anyone can do this.
One of my all-time favourite authors is , especially her Retrieval Artist series.
I guess if you're talking enthusiastically about something you may want to emphasise key words, but today's tutorial is about making spans of text appear differently, for example as bold or italic when you're not emphasising them.
As human beings who are looking at a page we've learned to distinguish between bold for headings, bold for emphasis and bold for book titles. But if a blind person is listening to a page it would become tedious, and perhaps confusing, to have random bits of text emphasised by the computer's voice when it's not actually emphasis. Similarly, if software, such as a search engine, is reading
your text then incorrect emphasis just throws it out of whack.
There's a virtue in just doing the right thing, in being a guardian angel
on the web.
Just today Micro.Blogger Holly Honeychurch wrote this in a longer blog post: I’m grateful for the small kindnesses of people. They don’t realise just how much difference they can make to another person’s life. They are, in those moments, guardian angels and it brings a passionate tear of gratitude to my eye to realise I met an angel today.
If you think I've gone off into a bit of a rant, then you'd be right. So many people make this basic mistake and it really makes a difference and is so easy to get right.
Make a span of text stand out
I started out this tutorial with a paean to my favourite author. I put her name in bold, and the title of a book series in italics. Here's how. By the way: in this tutorial you can click on her name in that first line to go to her website.
Copy and paste the following text into first.html and save. I had to break it up into several lines for convenience in this tutorial.
<p>One of my all-time favourite authors is
<span class="author">Kristine Kathryn Rusch</span>,
especially her <span class="title">Retrieval Artist</span> series. </p>
I found Atom just made an enormously long line so I had to scroll sideways. Obviously word-wrap isn't turned on by default. To fix that go to the Atom menu and select Preferences , then Editor. Scroll down to the Soft Wrap section and check the box. Then close the Settings tab.
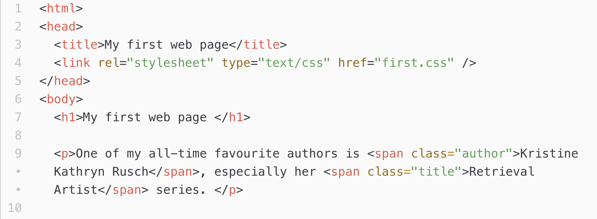
Use HTML to mark up a span of text.
- Mark up a span of text with
<span>tags and save. Assign aclassto the span so you can target it in the CSS. - Add rules for each
classto the CSS and save. - Refresh the browser.
Copy and paste the following text into first.css and save.
.author {
  font-weight:bold;
}

.title {
font-style:italic;
}
Notice: in the HTML file the class name is just author or title — there's no dot at the start. In the CSS file it's .author and .title, with a dot directly in front of the class name.

Span and class work together to change the appearance of a span of text.
Span and Class work together
A span is useful for marking out short spans of text. There are other techniques for long stretches of a web page. The span on its own though doesn't do anything — it's just saying to the web browser: this bit's special
.
Now we need a class. A class of text is a type of text. In the example above it's text of the author type or the title type. That gives us a hook
that we can grab onto in the stylesheet.
You can use whatever you like as the name of a class, but it can't start with a number. I suggest you keep it short and to the point — that way it'll be more memorable, easier to type and make sense in a year or two when you or someone else is looking at it.
Try changing some things in your own first.css. See if you can colour the author's name or the book title, swap the italics and bold. Now you know this we're ready to venture into the Edit CSS section of your Micro.Blog.
Be strong: give it some emphasis
Anyone can do this.
One of the very common things people want to do is to emphasise a few words. How emphatic are you feeling? Very or just a bit?
If you're feeling strongly about something then you can put it inside <strong> tags, like this:
<p>I just <strong>love</strong> seeing photos of people's pets. </p>
☛ I just love seeing photos of people's pets.
In most browsers that show a page to a visitor the emphasised word will probably come out in bold, while a speaking browser will use tone of voice.
If you feel less strongly then instead of strong you may choose emphasis tags, like this:
<p>I <em>love</em> seeing photos of people's pets. </p>
☛ I love seeing photos of people's pets.
That will likely be rendered in italics, or again, by a change in voice. The browser's built-in stylesheet determines what happens.
Let's control how emphasis looks with CSS
That text doesn't have to be rendered as bold or italic though — we could use CSS to do something different (or additional). We just need to add some rules to our stylesheet.
<p>I just <strong>love</strong> seeing photos of people's pets. </p>
<p>I <em>love</em> seeing photos of people's pets. </p>
- Copy the sentences above and paste them into
first.html. Remember: save! - Copy the code below and paste it into
first.cssbelow what's already there. Remember: save! - Go to your web browser and refresh
first.html.
Paste this code into your first.css file and save.
strong {
  color:purple;
  font-weight:normal;
}

em {
  color:green;
  font-style:normal;
}

We used CSS to make parts of the text purple or green — in this case emphasised words — and to remove bold and italics.
Both rules added a colour — you've done that before. What's new is the font-weight line and the font-style line. We set both to normal, taking away the bold and italics.
Next tutorial: how to do bold and italics that aren't for emphasis, but maybe film or book titles.
It's classified: HTML for all!
Anyone can do this.
There's one thing that all web browsers have in common: they're useless at guessing. On a web page, every single bit of text or whatever must be marked up with HTML to explain its function. If you leave something just lying around the web browser will have to guess what to do with it and the results could be unexpected, to say the least.
In the screenshot below I added a bit of text without any HTML tags to explain what it was. In my stylesheet I thought all my text was going to be black, but why is there a bit in red? It's because the browser didn't realise I wanted it the same as the rest because the HTML was missing.
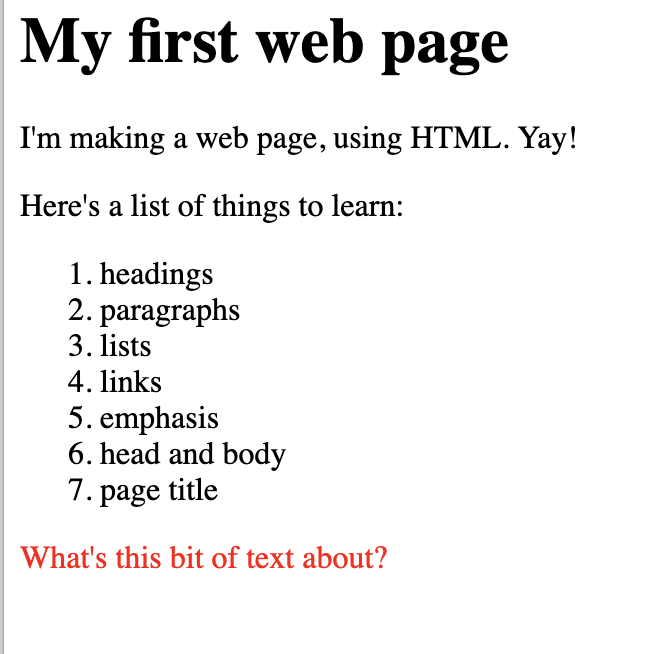
Why is that text red when it should be black?
By far the most common element in any blog post is likely to be a paragraph and Micro.Blog will handle that for you.
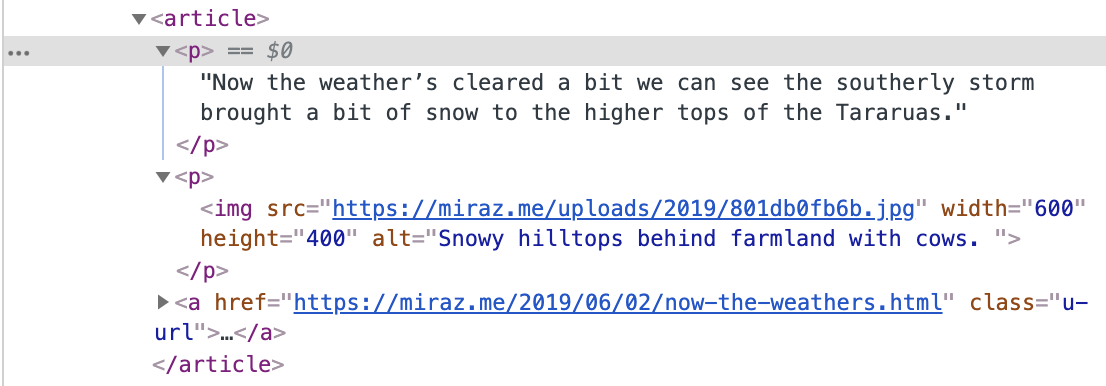
Micro.Blog automatically added paragraph tags.
While writing this tutorial I sent some text and a photo to my personal blog. I just wrote words (no HTML) in the Micro.Blog Mac app and added the photo, with some alt text (I'll explain alt text in another tutorial). Micro.Blog did the right thing and wrapped my paragraph and image in the correct HTML tags.
If you want to do something special with a bit of text then HTML can help you do that. The next tutorials will explain how.
Let's investigate a web page
Must read! Background information.
When we watch a movie we see a story unfold and with any luck we're drawn into the world and forget that it's all a big fraud. We see the characters interacting with people and landscapes. What we don't see is the hundreds of people behind the scenes handling props, makeup, cameras, lights and so on. Without all that supporting crew though the movie would be nothing.
When we're presented with a web page, the behind-the-scenes stuff is similarly invisible. All that HTML and CSS is there but not immediately visible. We can find it though if we know where to look. We can even change our own copy of it and see the effects those changes have.
The Inspect Element trick
Most, or perhaps all, modern web browsers let you take a look at the HTML and CSS behind web pages. Here's how.
- Hold down the Control key and click on the bit you want to inspect. A contextual menu appears.
- Choose
Inspect. Now a window of some sort opens and shows you all the HTML and CSS being used by the page. Usually it highlights the part you clicked on.
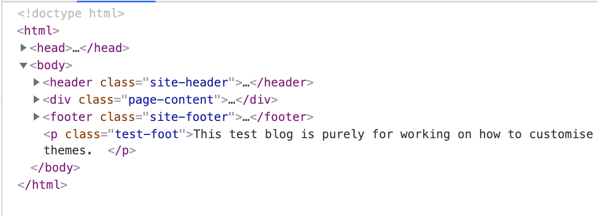
Inspect a web page.
Does the above screenshot look familiar? It has very similar HTML coding to first.html but actually it's a behind-the-scenes look at this tutorial. Notice the <html>, <head> and <body> sections. It shouldn't take too much hard work to also spot the header area (the top of the page), the area where the main content is displayed and the footer area. Also spot the paragraph.
Edit CSS locally
But what about the CSS? This is where I reluctantly reveal that in spite of our easy start CSS gets pretty tricky pretty quickly. 😒 Don't let that put you off.
Nevertheless, look around that Inspection window and you should see a part where the CSS is available. In my two screenshots below I'm using the Brave browser and the CSS appears in an area below the HTML. I've also scrolled down so I can see the part I'm looking for.
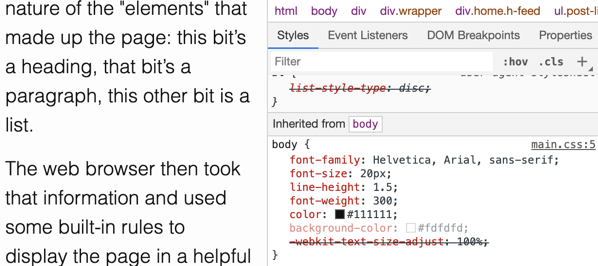
Inspect CSS.
In the left column of the screenshot the web page is displayed as rendered by the web browser. On the right are the rules for the body portion of the page (in other words, all of it). Note the line that says color. Notice also the tiny square of dark colour on that line. That square's showing the colour of most of the body of the page: rather black.
Click on the tiny square of colour and a colour picker will pop up. Click on another colour and watch the page change — on your computer only. You haven't changed the real web page, just the copy that's on your computer.
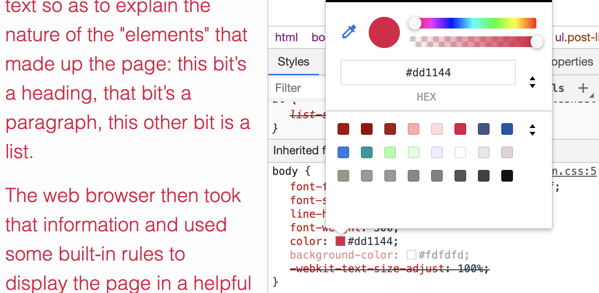
I changed the colour for body text to red.
This is an enormously powerful tool. You can bet that if you ask for help in customising your web page anyone who offers help will have used this tool to work out what's going on and how to make the change.
To get your page back to normal just refresh the browser.
Try this out on your own first.html page. Your page is a lot simpler than the Micro.Blog page in my screenshots and you should find it easy to see what to do.
On first.html also try clicking the small disclosure triangles in the HTML area to see all of your coding.
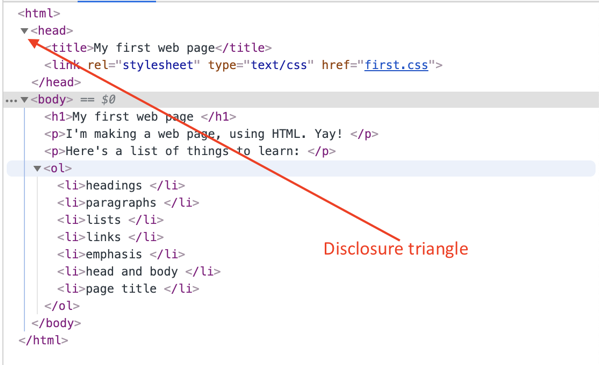
Disclosure triangles in the web inspector.
Also notice that if you hover over something in the Inspector a small checkbox appears. Uncheck that item to temporarily disable it. For example, when I viewed first.html and unchecked the box beside color:lime; the text turned black again.
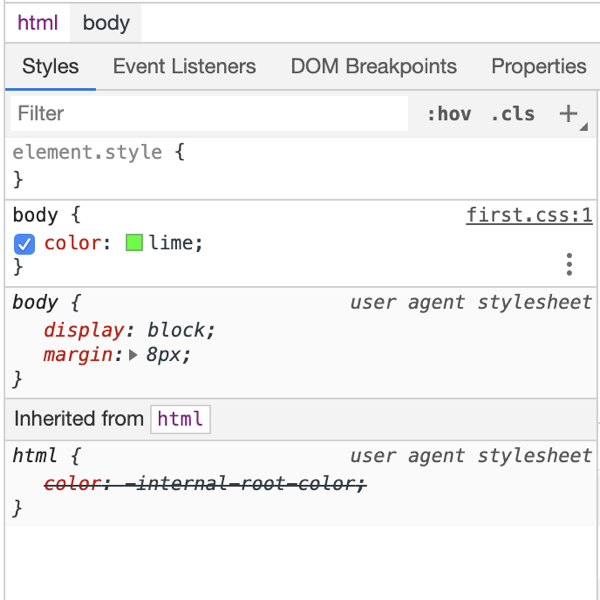
Uncheck an item in the CSS inspector.
Why did the body text turn black again when I turned off the lime colour? Because there are always at least two stylesheets at work: mine and the one built-in to the browser. Mine takes precedence, but if mine doesn't specify some particular thing then the browser uses its defaults, which include black for text.
It would be nice if all the web browsers out there used the same set of rules, but they don't. This causes web designers enormous headaches. It's like when two musicians play the identical piece of music: they'll sound different because they each bring their own particular style of expression to it.
Close the Web Inspector with the x in the top right corner or the normal close button, depending on your browser and how it opened the window.
Here's a 3-minute video I made way back in 2010 about this feature: Use Safari 5's Web Inspector - a gift for web developers. Or (Updated 2021: this website seems to have disappeared. 😒) read the Tip itself. I don't think you need to turn on the Develop menu any more.
Let's meet CSS
Anyone can do this.
When we wrote first.html we used HTML tags
to markup
the text so as to explain the nature of the elements
that made up the page: this bit’s a heading, that bit’s a paragraph, this other bit is a list.
The web browser then took that information and used some built-in rules to display the page in a helpful way: it made the heading big and bold, it put all the list items on separate lines, and even helpfully added numbers.
The set of built-in rules the web browser uses is called a Style Sheet because it describes the styles for the text: bold, indented, and so on. That’s where the SS part of CSS comes in. CSS stands for Cascading Style Sheet — a set of rules that tell a web browser how you’d like your web page to be presented.
Many people will look at a web page, so things like colour and layout are important for them. Many other people may listen to a web page (for example, blind people) so their web browser will use the HTML to make the voice sound different, for example using tone and loudness to convey emphasis. Most web pages will also be visited by software robots — think Google visiting your page to add it to the search engine. The software needs to be able to distinguish a heading from a paragraph, for example, because it attaches more value to a heading than a paragraph.
What about that Cascading
part of the name? The Cascading
part means that more than one style sheet can exist, and there are rules for how they work together. For example, the browser has a built-in style sheet but we can write our own stylesheet to override what the browser does by default.
Remember how the text on first.html was displayed as black text on a white background? That was the default. We can easily make it a different color — perhaps maroon.
Make a stylesheet
Start a fresh new text document in Atom. Save it in the same folder where you saved first.html. Give this new file the name first.css.
Now copy the following and paste it in to your new CSS file, then save the changes. The first rule of web pages: save.
body {
  color:maroon;
}

First style rule in our stylesheet.
Note the spelling of color — the u that many of us include in that word isn’t used. That’s not optional: no u!
That’s nice, but if you now go and refresh your web browser’s view of first.html you won’t see any changes. What!?
The problem is that you and I know you want these new styles to apply to first.html, but no-one told the web browser. You need to make a crucial change in first.html by adding information about the stylesheet.
Open first.html in Atom.
When you do things with HTML and CSS it’s a good idea to keep files open as you’ll need them over and over again. Save, but don’t close files as you work on them.
Link the stylesheet and HTML file
Every web page has two parts: a head and a body. The head contains information about the page, whereas the body holds the contents of the page. The head is like the spine, cover and front matter of a printed book.
To tell the browser that this page has a stylesheet and that the browser should use that stylesheet we need to add the following line in the head section of first.html. Copy the following line then paste it into first.html beneath the line that ends with </title>.
<link rel=“stylesheet” type=“text/css” href=“first.css” />
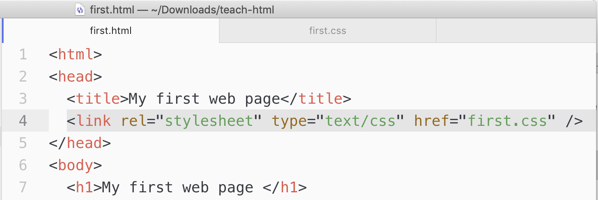
Link the stylesheet to the HTML file.
Now save first.html.
Go to your web browser and refresh the page. Voila!
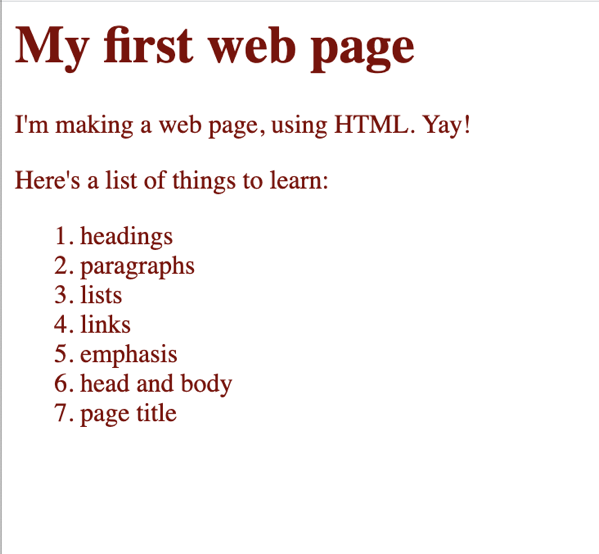
Maroon text in the body of the web page.
Try some colour experiments
Our rule in the stylesheet made all the text in the body of the web page maroon instead of black. There’s a restricted list of colour names you can use in CSS, but try replacing the word maroon with any of the following colours. Every time you change something be sure to save the file and also refresh the page in your web browser.
Partial list of colour names you can use in CSS:
- Aqua
- Black
- Blue
- Fuchsia
- Gray
- Green
- Lime
- Maroon
- Navy
- Olive
- Purple
- Red
- Silver
- Teal
- White
- Yellow
Note: capital letters don’t matter.
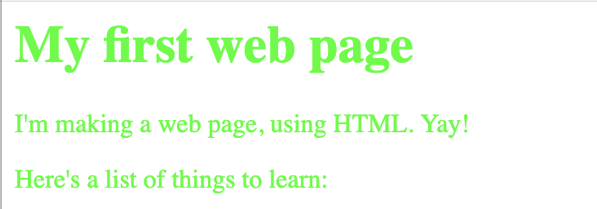
Owww, my eyes! Lime text! We’re back in the 90s!
Start coding HTML, plus: what is HTML?
Anyone can do this.
In the previous tutorial you created a plain text file called first.html and saved it to your desktop. In this tutorial we work with that file.
What HTML actually is
HTML is the markup language behind web pages.
OK, so we're starting with a simplification that'll give some experts apoplexy, but this tutorial is for beginners. There will be a lot of simplification going on over the course of these tutorials.
That means that HTML, an abbreviation for Hypertext Markup Language, is codes that you add around text to point out the purpose and structure of that text. When people view HTML coded text using a web browser they don't see the codes but only the text. Each web browser understands the HTML coding and uses built-in rules to display the text based on the information the HTML has given them.
Some examples of web browsers: Safari, Google Chrome, Firefox, Brave, Opera, Microsoft Edge.
Let's give some examples. In the screenshot below I've marked out a heading, a paragraph and a list with HTML. Look closely and you should easily see how it's working. The HTML codes point out the structure of my writing: heading, paragraph and list.
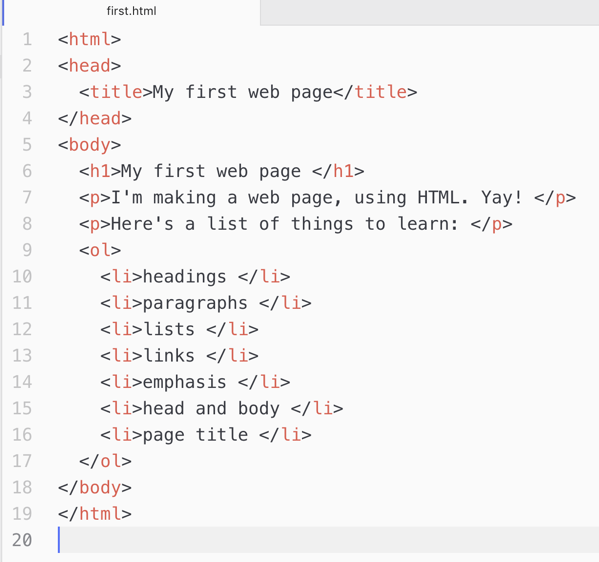
My first HTML page as it appears in Atom, the text editor. Some text is red-coloured — the HTML codes. Atom does this automatically and it's very helpful. It's called syntax colouring
.
Copy and paste some HTML
You do it: copy the following and paste it into your own first.html then save your file. The first rule of web pages: save.
<html>
<head>
  <title>My first web page</title>
</head>
<body>
  <h1>My first web page </h1>
  <p>I'm making a web page, using HTML. Yay! </p>
  <p>Here's a list of things to learn: </p>
  <ol>
    <li>headings </li>
    <li>paragraphs </li>
    <li>lists </li>
    <li>links </li>
    <li>emphasis </li>
    <li>head and body </li>
    <li>page title </li>
  </ol>
</body>
</html>
View the web page
Now let's look at that in a web browser. I'm using a browser called Brave, but all web browsers should show approximately the same thing.
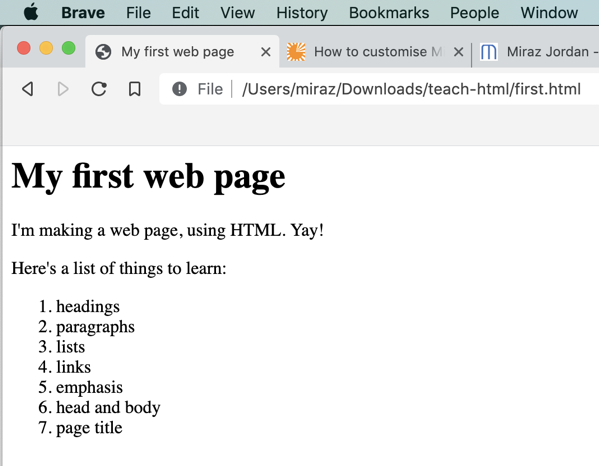
My first web page as displayed in a browser.
To open your first.html in a web browser go to your browser, for example, Safari, and choose Open File… from the File menu. Locate your file (I suggested you save it on the desktop) and click the Open button.
You can see that the text marked up
with an h1 has been rendered as a heading. The browser used its built-in rules to make that heading look big and bold. (A browser for blind people which reads the page aloud would also indicate that this part is a heading.)
The list has been made to look like a list, and magically, numbers have been added to the list items.
There's no sign in the browser though of the HTML coding. The HTML was instructions to the browser about how to render
the page of text.
If you're used to seeing shiny web pages with colourful stuff all over the place you might not realise just what an achievement this is!
If you've never made a web page though and perhaps even thought it was some arcane skill you'd never be able to grasp, then take a moment to appreciate what you've done.
It's very much like being a composer who writes a piece of music and then hears it played by an orchestra.

Music score fragment.
HTML has a lot in common with musical notation. A composer puts marks on a stave, along with instructions about things like speed and nature of the music. Then an orchestra interprets those instructions and plays the notes accordingly. In the same way, a web page has text and HTML instructions about how a browser should render
that text.
At the moment you've written an extremely basic web page using HTML. 🎂 🥳 From here on out it can only get better!
Starting coding with the right tool - a text editor
Anyone can do this.
If you can write an email or text to a friend or a post on Facebook then you can learn to write HTML too. 😀
Next tutorial after the following essential information: what is HTML and how does it work.
To write HTML you need a text editor (hundreds of examples) and not a word processor (eg MS Word).
You can use TextEdit which comes free with every Mac but you need to make sure the Preferences are set for plain text not rich text, smart quotes are off, that files are saved with the .html file extension and that you view HTML files as code and not formatted text. If you already use TextEdit for other purposes then changing those settings could become very annoying. For that reason this tutorial will show you how to write HTML using the free text editor called Atom.
Download, install and open Atom. The Welcome Guide may look a bit scary but just leave it for later. I did change the theme to use black text on a white background because I prefer that and it's better for screenshots.
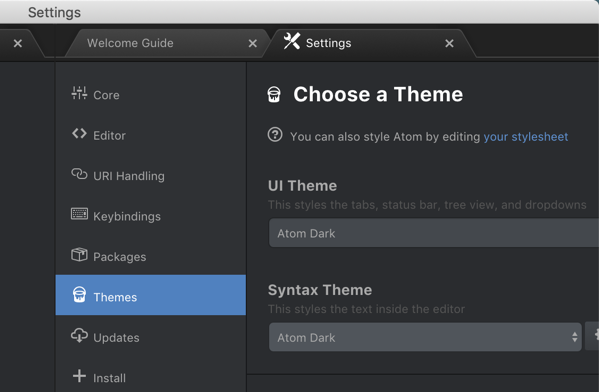
Atom themes area.
Make and save a new file in Atom
Open Atom and choose New File from the File menu. A new tab opens.
By default that tab appears on the right of the Atom window along with a mess of other open tabs. I prefer a 'clean' workspace so hovered over the title of each other tab and closed them all with the small x that appeared at the right-hand end.
Another way to do that is to Control-click on the tab you want to keep. A Contextual menu appears. Choose Close Other Tabs.
My screenshots all show just the documents I'm actively working on.
You haven't worked on the file yet but this is a good time to save it. It's extremely important that you know where you've saved it — I suggest the Desktop at this stage in your learning and my instructions will assume that's where it is. Give your file the following name: first.html. That will allow me to use that name in these instructions and for us all to be on the same page
.
Now we're going to make a very simple and basic web page so you can learn about HTML without having to do experiments on your actual blog.
Go to the next tutorial to start learning about HTML.
The skills you need to use different colours, and make other changes
Background information.
Anyone can choose a theme, change the title of their site or their profile photo. Those things require no special expertise (apart from maybe photo editing).
Using your own domain name requires either knowing how to change DNS records or getting the domain registrar's Helpdesk to make the change for you.
Adding a footer is easy, but the results will almost certainly be disappointing unless you understand how to make that footer look good with HTML and CSS (Huh? Read on.).
Adding a favicon can be done if you follow instructions very carefully.
All of those things are relatively simple to do. From here on out though, you'll need to do some learning. Don't worry, I have tutorials (and the experience of helping hundreds of beginners to learn this stuff) that will give you the foundation to make changes such as:
- Change the colour of certain bits of text, for example links.
- Make images stand out more.
- Use a header image.
For those kinds of changes, even if you ask for help (or especially if you ask for help), you'll need to know a little about the hidden coding that makes web pages work. That coding is called HTML and CSS. I'll explain below what those names mean and why you should learn a bit about them. I'll also explain how at the most basic level both are quite straightforward.
If you want to get really fancy and completely customise everything about your blog then you'll need to know HTML and CSS for sure, and also other things I'll get to later. So let's start at the beginning with HTML, also known as Hypertext Markup Language. It's not hard.
Change your Profile Photo
Anyone can do this.
By default Micro.blog uses the Gravatar service for your profile photo. You can easily change your blog’s profile photo at any time from within Micro.Blog though.
In this tutorial I’ll change the profile photo on my personal blog. My blog uses the Marfa theme which puts the profile photo at the top of the Home Page. Note: I’ve customised the way this photo displays as will be explained elsewhere on this blog.
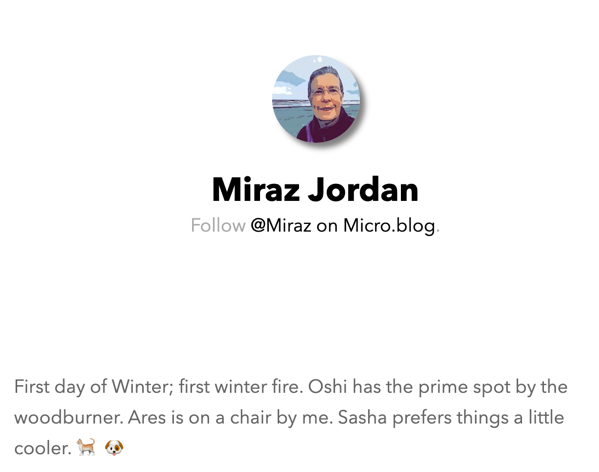
Old profile photo as it appears at the top of my Home Page.
Change your profile photo
- Select a photo you want to use and save it in a place where you can find it. Tip: if necessary crop and adjust the photo before saving as you won’t be able to make such changes from within Micro.Blog.
- Go to the
Accountpage and scroll down to the About me: section. - Click on the
Editlink below the profile photo. TheNew profile photopage appears. - Click the Choose File button and in the window that appears choose the photo you saved in step 1 above. Click the Choose button in that window to confirm your choice. You’re returned to the
New profile photopage. - Click the Upload button to upload your photo to Micro.Blog. The picture appears above a Delete button. This is now your new profile photo. If you’re happy skip to the final step.
- If you don’t like the new photo use the Delete button to remove it then select and upload a different photo. Note: in my case I edited the photo on my Mac after uploading but kept the filename the same. I had to Delete the previous attempt to get the new version to upload. If you upload a photo with a different filename you don’t need to Delete the previous one.
- Check your blog — refresh the page, if necessary a couple of times till the new photo shows up.
Tip: Micro.Blog is a community and while you’re free to choose whatever you want as a profile photo, it’s friendly to choose a photo of yourself for a personal blog. A quick look at my timeline in June 2019 shows that most folks use a photo of themselves as their avatar. On the other hand, my Love Waikawa Beach blog uses a beach photo, this site has a symbol, and some businesses use their logo.
Screenshots
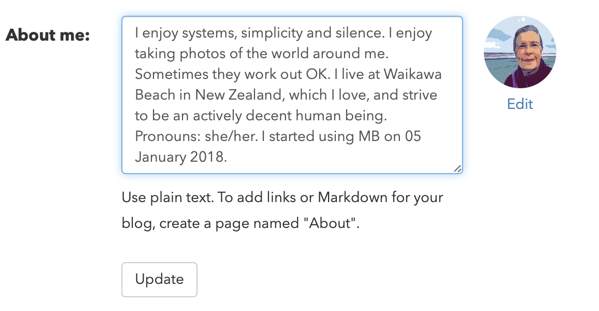
My old profile photo in the About me section.
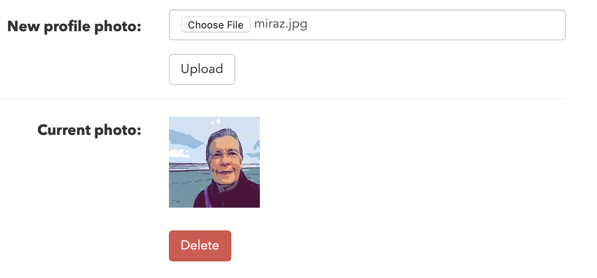
I’ve selected and am about to upload a new photo. This is still the old photo.
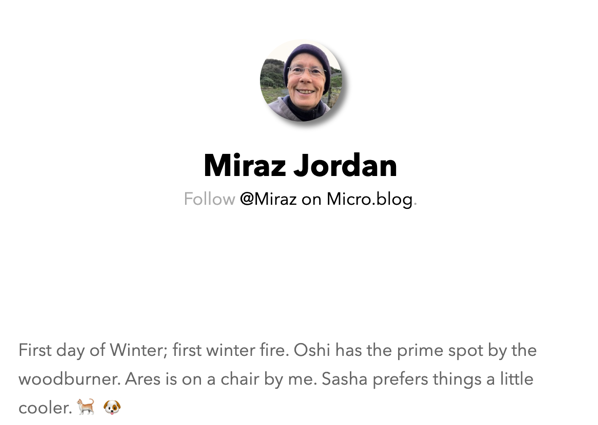
My new profile photo.
Add a favicon
You can do this. Follow the detailed steps carefully.
A favicon is the small image associated with a particular website. In the screenshot below you can see three browser tabs. Each tab has a small image on the left — that's a favicon. I've drawn a red box around each to help you see it.

Favicons on browser tabs.
Micro.blog uses your profile photo as a favicon which shows up in various places, for example in the Timeline in the Micro.Blog Mac app or at the top of the Home Page in some themes. Read more about the profile photo.
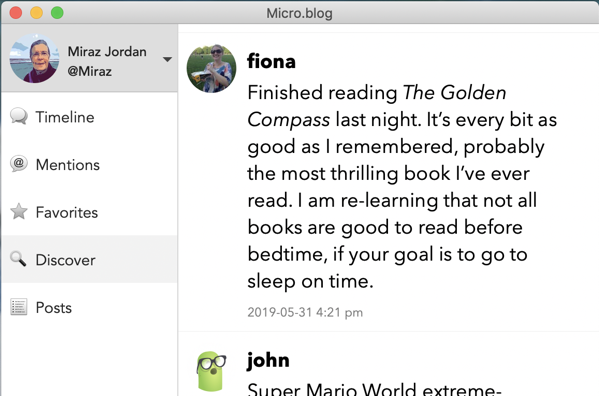
Profile pics in the Micro.Blog Mac app.
Set up a custom favicon
Use a custom favicon if you prefer — there are several steps involved:
- create a suitable square image.
- upload it and copy the address.
- edit a theme file to use the address.
- save changes.
- check.
Help! My theme doesn't have the line for a custom favicon. No problem: copy this line: <link rel="shortcut icon" href="https://{{ .Site.Author.username }}.micro.blog/uploads/yyyy/nnnnn.png" type="image/x-icon" /> and paste it in to head.html as in the screenshot below.
Detailed favicon instructions
See screenshots below the list of steps.
- MAKE AN IMAGE:
- Create and save a square image that will look good when it is tiny. Search online for sites that will turn your image into a favicon. Micro.Blog will definitely accept a
pngformat image. - UPLOAD THE IMAGE:
- Go to the Uploads area of your Micro.Blog and upload the image.
- Right-click on the image you have uploaded and choose to
Copy Image Addressfrom the contextual menu. When I did this step this address was copied:http://tewaka.micro.blog/uploads/2019/61cf20c336.png. You may like to paste the address of your image somewhere so you can find and use it again in step 4 below when you need it.
- CREATE A NEW CUSTOM THEME:
- Go to the Design section of your blog and scroll down to the Custom theme: area.
- Click on Edit Custom Themes. You’re taken to a new page with a New Theme button. (Note: if you’ve already done some work on a custom theme then any custom themes will be listed here.)
- Click the New Theme button. You’re taken to a new page with a form you use to create a new theme.
- Click in the Title: area and give your theme a name. For this tutorial you will ignore the Clone URL: field as it’s not relevant at the moment.
- Click the Add Theme button to complete this step. You’re returned to the page that lists your custom themes. You may see a warning that your blog
does not have a custom theme set
. You can ignore that until after the next steps — your new theme needs to be activated, but there’s more work to do first.
- EDIT YOUR NEW CUSTOM THEME:
- The Title area of the Custom Themes page lists all the custom themes you have. Click on the name of the theme you created in the last step. The Theme Templates page is loaded.
- The Theme Templates page lists all the files that lie behind your blog. At the bottom are templates that are used by all hosted blogs (Default Templates). Above that are the templates that belong to the theme you’ve selected for your blog. Look for the template in the upper list whose name end with
head.htmland click that template to edit it. You’re taken to a template editing page. - On the template editing page look for a line which says:
<link rel=“shortcut icon” href=“https://micro.blog/{{ .Site.Author.username }}/favicon.png” type=“image/x-icon” />. Carefully replace this part:https://micro.blog/{{ .Site.Author.username }}/favicon.pngwith the address for your favicon image. You copied that address back in Step 2 above. Be careful to keep the speech marks around the address. TIP: if the wordtype
following the image address changes from bright red to a different colour then you’ve made a mistake. Check to see all the speechmarks are still intact. - Click the Update Template button to save your changes. Your changes are saved and you’re returned to the Theme Templates page. You’ll see a new Custom Templates section at the top with one item called
layouts/partials/head.html. - Click the Back button above the list of templates. You’re returned to the Custom Themes page. You may still see the warning message mentioned above.
- SAVE THE CUSTOM THEME:
- Click the Edit Design link in the warning message. You’re returned to the
Designpage. Another way to reach theDesignpage is to click on the Posts link at the top of any behind-the-scenes page on your blog and then click the Design button. - Scroll down to the Custom theme: area and choose your custom theme from the pop-up list.
- Click the Update Microblog Settings button to save your changes.
- Click the Edit Design link in the warning message. You’re returned to the
- CHECK YOUR BLOG:
- Note: this step can take a few moments and may need a few tries as the web browser may hold onto (cache) the old favicon. Open your blog in a web browser and refresh the page. Look to see if the favicon has been updated.
- If you’ve tried several times to refresh and it doesn’t seem to have worked then try a different web browser or a Private Window in your web browser. Try visiting a different page on your blog. Try refreshing a few more times.
- If you’ve tried repeatedly and it’s still not working you may need to look again at your custom template and confirm the image address is correct. Try going directly to that image address in your web browser and make sure you’re seeing your new favicon.
- If everything you try fails then join the free Micro.Blog Slack group and ask for help. The folks on there are friendly and should be able to give good advice with troubleshooting.
If you’re seeing your new favicon in the right places then congratulations! It took a bit of work, but now your blog has a unique image to identify it.
Screenshots
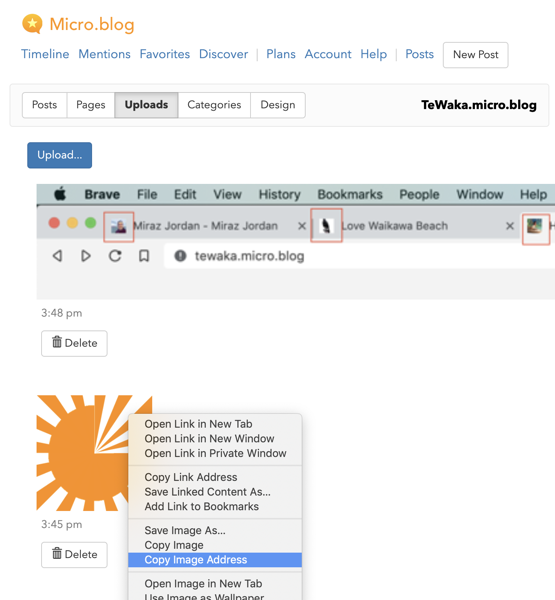
Upload the picture and copy the address.

Click on Edit Custom Themes.
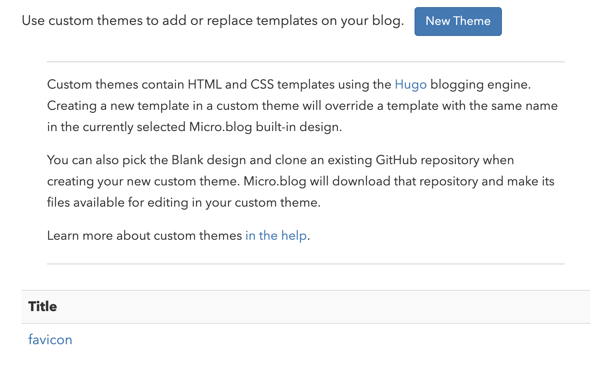
New Theme page. I already have a custom theme called favicon. I could edit the favicon theme by clicking its name.
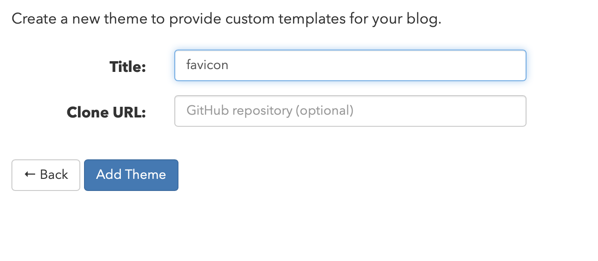
Name the new theme.

No custom theme has been set.
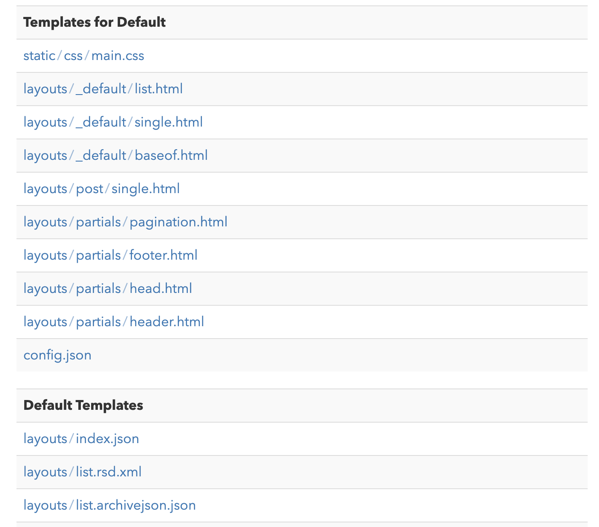
Themes templates list. In this screenshot the blog is using the Default Theme, so the list at the top (Templates for Default) is the templates specific to my theme. The list at the bottom (Default Templates) is of templates used by all hosted blogs.
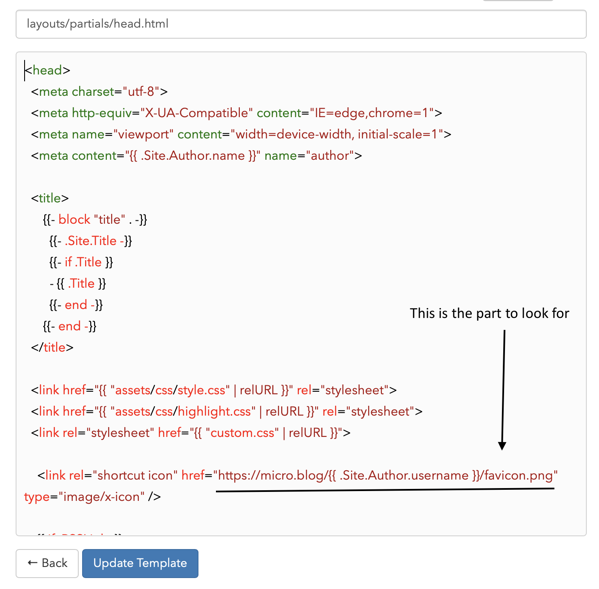
Edit head-html template.

The newly created template appears in the Custom Templates section.

Select a custom theme.

New favicons in 2 tabs. While writing this tutorial I changed the favicon for this blog and for my private blog. In the screenshot you can see my old favicon on the left and the new one in the next tab. You can also see the new favicon for this blog on the right. Compare this screenshot with the one at the top of the page.
Add a footer
Anyone can do this at a basic level. Making it look great, or even good, could require some expertise.
If you'd like something to display at the every bottom of every page on your blog then you could add a Custom Footer. Many themes already have a Footer — it may include a Search box, a link to your blog or to RSS feeds, a Copyright statement, information about the theme, or something else.
Here are the footers from two of my sites which use different themes from one another.

Footer on my personal blog.

Footer on my Love Waikawa Beach blog.
While I was developing this site I added a Custom Footer about it being a test blog. The items about subscribing via RSS and Following the blog come from the theme I chose.

TeWaka custom footer.
The custom footer in the screenshot above includes HTML coding so it displays in white on black and centred.
I had to do some extra coding to centre the text and put it in white on a black background.
If you add a custom footer it may not turn out as you expect. Elsewhere on this site I aim to add instructions about using CSS and HTML for customising your blog. Don't know what CSS and HTML are? That'll be explained later.
Add a plain Custom Footer.
- Go to the Design section for your blog.
- In the Custom theme: section click on the Edit Footer button. A new page opens up with a box for entering coding for a Footer.
- Enter what you want in the Footer.
- Save your changes with the Update Footer button.
- Visit your blog and Refresh to see the changes.

My custom Footer code for this blog while I was developing it.
You may find that without special coding your Custom Footer displays in a weird or unacceptable way. In that case go back and remove it, then read more of this blog to find out about HTML and CSS.
Choose a theme
Anyone can do this.
The Theme determines the look of your blog, and to some extent how it works. As of May 2019 Micro.Blog comes with 10 ready-made themes to choose from.
Update, April 2022: this has now changed. Themes are now available as Plugins. This tutorial needs to be updated.
In the Design area of your blog are the themes available, along with thumbnail pictures that give an idea of how a blog looks with that theme behind it.
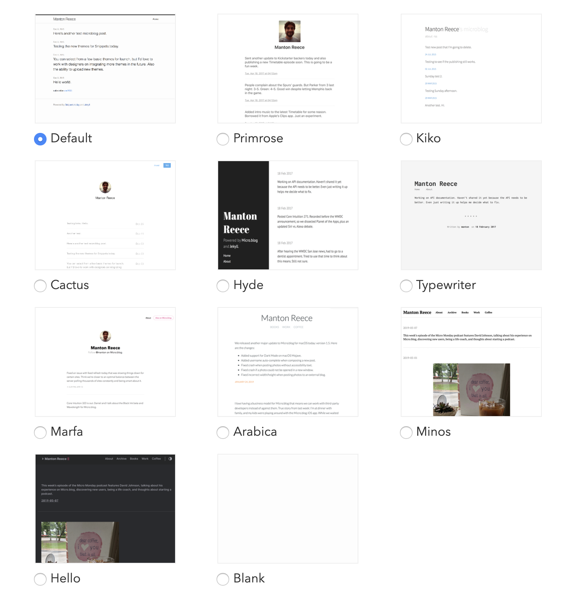
10 default Micro.Blog themes.
There is also a Blank theme available for people with advanced skills.
It's easy to change from one built-in theme to another:
- Click the radio button to the left of the name of any theme (except the Blank theme).
- Scroll down the page and save your changes by clicking the Update Microblog Settings button.
- Visit your blog and Refresh to see the changes. Explore a little too because each theme may handle your blog a little differently, for example by only putting part of each post on the Home page and allowing you to click through to read the rest.
All themes differ in their coding. If you've customised one theme, for example changing the colour of post titles, you may have to change that Custom CSS for the new theme.
If you don't like the change you made go back to the Design area of your blog and change to another theme.
Note: be careful which web browser you use to view your blog (Safari, Firefox, Chrome, Opera, etc) as different web browsers can handle web pages in different ways.
Change the title of your site
Anyone can do this. Recommended.
Micro.Blog will automatically set the Title of your site to your username, but you can change that.
The Title may show up in the tab of your browser, and if someone bookmarks your site the Title will be the suggested name. Depending on the theme, the Title may also show up at the top of your Home Page and perhaps elsewhere.

Default site title in the browser tab and at the top of the Home Page.
Change that Title to suit yourself.
- Go to the Design section for your blog.
- Enter a Title in the Site title: section.
- Save your changes with the Update Microblog Settings button.
- Visit your blog and Refresh to see the changes.
- Notice that the URL has not changed.
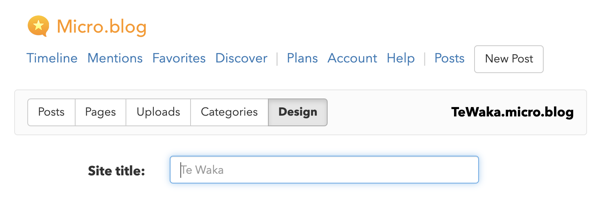
Customise the Site title.

The new Site title appears at the top of the page and in the browser tab.
Use your own domain name
Requires a bit of expertise, or using the domain registrar’s Helpdesk. Recommended though.
Some people would rather have their Micro.Blog at their own domain name. It’s reasonably simple to do though there are a few steps.
This is only possible if you pay for Micro.Blog hosting.
- Buy your domain name from a domain name registrar. I personally am happy with Hover and Freeparking NZ, but many people will give you recommendations if you just ask. Micro.Blog suggests DNSimple.
- Log in to your domain registrar and find the place where you can edit the DNS records for your chosen domain name. DNS stands for Domain Name Server.
- In a separate tab or browser, visit Custom domains on the Micro.Blog Help site for detailed instructions on what to do next. If you aren’t sure what to do or are having other problems contact your domain registrar’s helpdesk for support. You can point them to the above Custom domains instructions for their information.
- After making the changes at your domain registrar it may take a day or two for things to update, so wait for a bit.
- Go back to your blog to the Design section and scroll down. Fill in the Domain name: section and click the Update Microblog Settings button.
- Now test your domain name in a browser. If you have problems wait a few minutes and try again. After that, contact Micro.Blog Help if things don’t seem to be working.
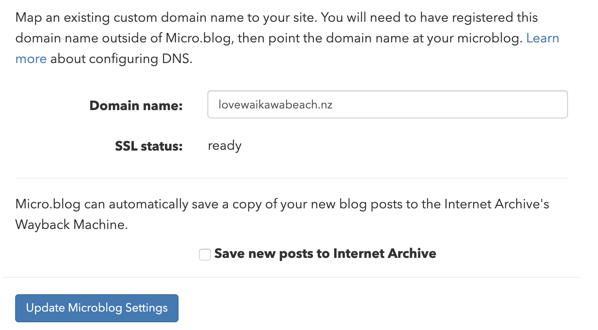
Micro.Blog domain name section.